
Introduction
Product Tour
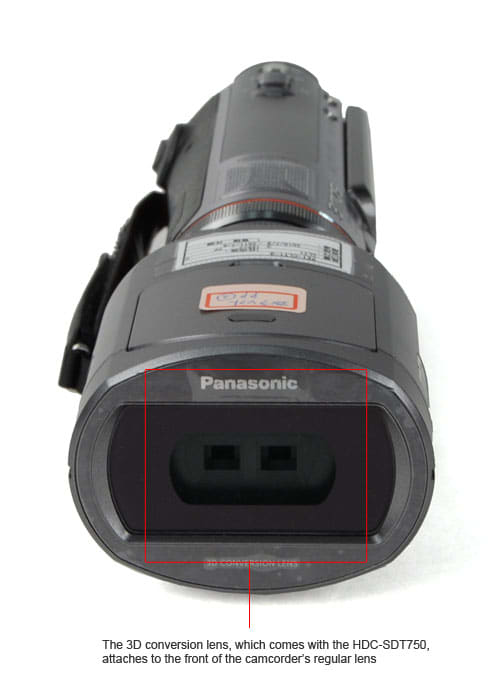
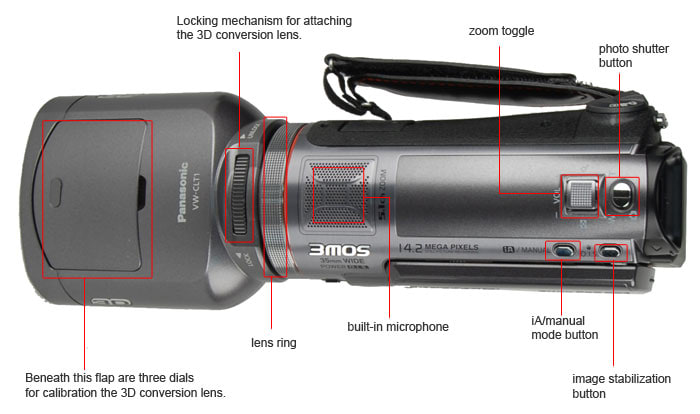
The actual lens on the HDC-SDT750 doesn't appear any different than what Panasonic implemented on the HDC-TM700. It has the same 12x optical zoom and the same aperture and focal range. Panasonic did add two new notches on the front of the lens, though, which allows you to attach the 3D conversion lens (VW-CLT1) to the front of the camcorder.
Adding this conversion lens completely alters the lens specs. It changes the aperture to a fixed f/3.2 (which is why the camcorder needs so much light when recording 3D content), it locks the focal range to 2.5mm, and it eliminates your ability to use the camcorder's optical zoom. The conversion lens also drastically alters the wide angle that the camcorder records video (reducing it by roughly 25°).
Color & Noise
The Panasonic HDC-SDT750 produced colors in our bright light test with splendid accuracy and excellent saturation. The camcorder measured a color error of 3.04 and a near-perfect saturation level of 99.23%. These numbers, along with most of the SDT750's numbers in our video testing, are very similar to what we saw on the Panasonic HDC-TM700. (More on how we test color.)
The HDC-SDT750's Color Error Map (above) shows that the camcorder produced most colors with very good accuracy. Only a few of the red tones on the camcorder were off, and even they were fairly accurate. The camcorder's colors looked vivid and strong, with our only complaint being that certain red images were a bit over saturated (see images below).
There aren't any color preset modes on the HDC-SDT750 (except for the soft skin detail mode that smooths skin tones), but the camcorder does have manual color saturation control and a white balance adjustment feature. Examples of these settings are shown above, while the images shown below are comparisons in auto mode.
Even though all of the camcorders in this set did a decent job in our color tests, neither the Sony HDR-CX550V nor the Canon HF S21 could match the color accuracy of the two Panasonic models. All of these camcorders do have some sort of color adjustment controls, however, so you can tweak the colors in ways to suit your liking for these models.
The Panasonic HDC-SDT750 averaged one of the lowest noise levels we've seen in our bright light test. The camcorder registered a noise level of 0.3825% in this test, which is lower than the rest of the camcorders in this set—even though, they also did well on this test. (More on how we test noise.)
The only camcorder shown above that didn't do exceptionally well on this test is the Canon HF S21, which measured just average noise levels in bright light. Still, when you look at the crops above the images look very good overall. Each of these high-end models captured a sharp, clean image in bright light, but you can see some slight differences when you look closely. For example, the Sony HDR-CX550V's image isn't quite as sharp as the competition (but the difference is very slight).
Motion & Sharpness Performance
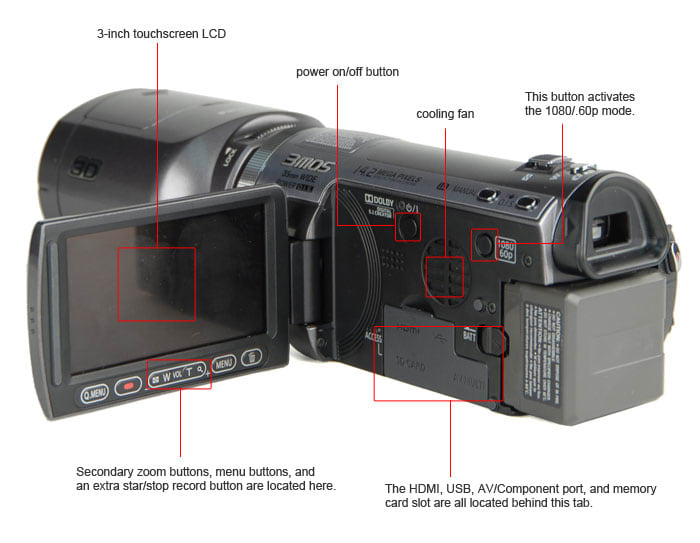
The Panasonic HDC-SDT750 is one of the best camcorders on the market in terms of motion capturing. The quality of its 1080/60p mode is stunning and the camcorder shows minimal signs of artifacting and blur. There was some trailing with the 60p mode, but overall the camcorder produced impeccable results in our motion test. Even with the SDT750's regular 60i mode things looked fairly good—although it's the 60p mode that puts the camcorder over the top. (More on how we test motion.)
The one downside of the HDC-SDT750's performance in our motion test (and Panasonic cams in general) is that its 24p Digital Cinema mode doesn't look as good as Canon's 24p options. The Canon HF S21 also has a native 24p setting that uses a similar MPEG-4 compression system as Panasonic's 1080/60p mode.
In addition, we also weren't too crazy about the motion quality when shooting 3D video with the SDT750—particularly when the we panned or moved the camcorder quickly. Motion looked disorienting and wasn't pleasant to watch in 3D when we shot sample video like this.
Just like the HDC-TM700 before it, the Panasonic HDC-SDT750 did much better on our video sharpness test when we shot using its 1080/60p mode than with its 1080/60i mode. Shooting 60p video, the SDT750 measured a horizontal sharpness of 1000 lw/ph and a vertical sharpness of 900 lw/ph (the same numbers we got from the HDC-TM700). Switching things over to 60i recording, and those numbers drop significantly, down to 900 lw/ph horizontal and 600 lw/ph vertical (which are still very good scores). (More on how we test video sharpness.)
We should also note that shooting 3D with the HDC-SDT750 significantly reduces the sharpness level for the recorded image. We don't have the exact numbers, but the camcorder's 3D image is far less sharp than what we saw from the SDT750's regular 60i video. This is especially true when you record moving subjects in 3D.
Low Light Performance
**Low Light Sensitivity***(5.62)*
The HDC-SDT750 required 12 lux of light to reach 50 IRE on our waveform monitor. This is a good score, but it is slightly more light than the Panasonic HDC-TM700 needed for the same test. This small difference between the two models may have to do with some altered processing or slight changes in the lens design of the SDT750 in order to accommodate its 3D capability. (More on how we test low light sensitivity.)
When shooting 3D with the HDC-SDT750 the camcorder requires a lot more light to record a usable image. The camcorder needed approximately 55 lux of light to reach 50 IRE with its 3D lens attached (that's over four times as much light than the camcorder needed without its 3D lens). Panasonic is honest about this fact, at least, as the SDT750's instruction manual explicitly references the fact that the camcorder needs more light for 3D shooting.
Strong low light performance continued for the HDC-SDT750 in our color test, with the camcorder putting up better numbers than the HDC-TM700 and the rest of the high-end models we compared it to. The SDT750 registered a color error of 4.28 and a saturation level of 82.12% in our 60 lux low light test. Of those two scores, the saturation level may be the most impressive, as it is far higher than what we measured from the Canon HF S21 (65.13%) and the Sony HDR-CX550V (60%). The HDC-TM700 managed an equally-strong 81% saturation level in this test. (More on how we test low light color.)
Overall, there wasn't much of a difference between the HDC-SDT750's and HDC-TM700's low light color performance. Both camcorders did very well and the fact that the SDT750 had a slightly better color accuracy score isn't all that significant (the difference wasn't huge). Panasonic camcorders have done exceptionally well in low light this year and we're pleased to see the HDC-SDT750 continue this trend.
For those that are curious, the HDC-SDT750 put up nearly identical numbers in this test when we shot using its 24p Digital Cinema mode instead of its normal 60i record setting. Also, we should remind you that the camcorder's performance shooting 3D content in low light looked a whole lot worse than its regular recording.
Continuing its strong overall low light performance, the HDC-SDT750 earned top-notch numbers in our low light noise test. The camcorder averaged 0.68% noise, which is statistically identical to the noise levels we measured on Panasonic's previous top-of-the-line HD camcorder, the HDC-TM700. More importantly, however, this noise percentage is a good deal better than what the Canon HF S21 and Sony HDR-CX550V measured in the same test. (More on how we test low light noise.)
Looking at the images above, you can actually see the noise on the image produced by the HF S21. The fine specs of noise clutter the vertical trumpets that scale down the left side of the image. You can also see a bit of discoloration and noise on the Sony HDR-CX550V's image, but it isn't as significant. Both Panasonic models offer crisp images in low light, which is why they scored at the top of our low light performance testing.
In defense of Canon, the HF S21 (as well as all Canon models) includes various alternate frame rates that significantly boost low light performance when used. The HDC-SDT70 has one of these alternate frame rates in the form of its 24p Digital Cinema mode. When this mode is used, the camcorder measured even less noise in our low light test (0.5525%), but its performance in our low light color accuracy test showed no improvement.
Compression & Media
The Panasonic HDC-SDT750 uses AVCHD compression just like most consumer camcorders that record HD video. However, since AVCHD can't handle 1080/60p, the camcorder also makes use of an "original format" MPEG-4 compression system for recording footage in the 60p mode. This is the same system that was employed on the Panasonic HDC-TM700. Read more about the advantages and disadvantages of AVCHD.
3D files are recorded as regular AVCHD clips on the HDC-SDT750, so there's nothing different about importing them to a computer. If you view the clips on a regular (non-3D) HDTV, though, you'll see two images on the screen split down the middle. This is also what you'll see if you import the 3D clips to an editing program.
The HDC-SDT750 is a card-only flash memory camcorder, which means it has no internal memory for storing video or photos. Leaving out internal memory helps keep the cost of the SDT750 down, but it also means you must purchase an SD/SDHC/SDXC memory card before you can start recording video with the camcorder. Read more about the advantages and disadvantages of flash memory.
The recording times vary on the HDC-SDT750 depending on what quality setting you use. The 1080/60p mode is the highest quality setting (it records at the highest bitrate), so it allows for the shortest record times. There are other versions of the HDC-SDT750 available in Japan that do include internal memory (like the HDC-TM750), but those models are not available in the US.
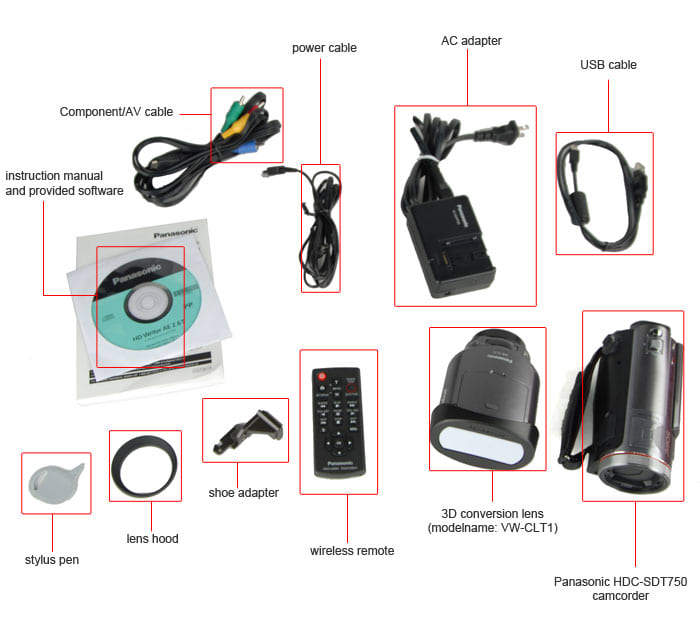
The Panasonic HDC-SDT750 ships with HD Writer AE version 2.6—the same software that comes with the Panasonic HDC-TM700 (and HDC-HS700). The software enables you to import video, including 1080/60p clips that some editing programs may not be able to handle. For an overview of the software that ships with the Panasonic HDC-SDT750 and other Panasonic camcorders, see our article: "Video Editing Software For Your Camcorder"
3D clips can be imported using the provided software and the clips are also compatible with most editing programs (any editing program that is compatible with AVCHD). When you import them, however, the clip will display two distorted images side-by-side. When viewed on a 3D TV, these images will overlap to create the 3D effect.
Manual Controls
We've written about Panasonic's great auto controls in our previous reviews for the Panasonic HDC-TM700 (read more here) and the HDC-HS60. The HDC-SDT750 has the same automated features as these predecessors, which include its Intelligent Auto (iA) system, AF/AE tracking, face detection, and good autofocus controls. The weakest auto feature on the SDT750 is probably its auto white balance system, but it is also one of the easiest features to set manually (as long as you have a white card you can point the camcorder at before you start shooting).
With the 3D conversion lens attached to the HDC-SDT750 you don't have access to many manual controls. Everything runs in auto mode with the exception of white balance, which can be set manually or you can use one of the camcorder's presets. We found the camcorder to occasionally take a bit more time with its autofocus system when the 3D conversion lens was attached, but it still worked adequately. Auto exposure was also more of a challenge with the conversion lens, but most of that had to do with the fact that the camcorder needs far more light when shooting 3D content instead of 2D. on
You can zoom with the SDT750 by using the zoom toggle on the top of the camcorder, by rotating the lens ring, or by using the zoom buttons on the base of the LCD panel. Of these methods, the zoom toggle is the one we prefer. It offers the most precise zoom control, as well as allowing you to variably control zoom speed based on how hard you press the toggle. No matter what method you choose to zoom a bar and numeric display will appear on the LCD during the zoom process.
With the 3D converter lens attached to the HDC-SDT750 you cannot zoom (the lens is fixed). This may be an annoyance at times, but it does help you make sure you record subjects at the correct distance for the optimal 3D effect.
The HDC-SDT750 has a 12x optical zoom lens. You can crank up the zoom to 18x using Panasonic's "intelligent zoom" option, which shouldn't result in image degradation (it makes use of unused pixels in order to increase the zoom). If you wan to zoom beyond 18x, you must use digital zoom on the SDT750, of which the camcorder has 30x or 700x options. We recommend staying away from the digital zoom features, though, as using them will make your video quality look much worse.
Manual focus for the HDC-SDT750 functions the same way it does on other Panasonic camcorders (including the HDC-TM700). You focus manually using the lens ring, which offers precise adjustment and is quite comfortable to use. There's also a colored peaking option for focus assistance.
There is no manual focus available when shooting in 3D with the SDT750.
We don't like the fact that Panasonic buries the exposure control option on the HDC-SDT750 and the rest of its consumer camcorders. You need to dig through the menu system, find the Picture Adjust submenu, and adjust the "brightness" option in order to do a simple exposure adjustment. We wish this was easier to find and access, but in the meantime you could always just manually set the aperture or shutter speed to adjust exposure levels instead.
The HDC-SDT750 allows for complete manual aperture control that isn't tied to an automatic shutter speed setting (you can set aperture and shutter speed independently from one another). You can adjust aperture (called Iris on the camcorder) using the touchscreen or the lens ring. This gives you a good amount of versatility.
Unfortunately, the camcorder's manual gain adjustment is tied to the aperture, which is something we don't like. It limits the amount of control you can have over depth of field, particularly when you shoot in low light situations. Also, aperture cannot be set manually when using the 3D converter lens. With the lens attached, the SDT750's aperture is locked at f/3.2.
The HDC-SDT750 has a wide range of shutter speed controls that can be set manually, but the camcorder doesn't have many slow shutter options. The lowest shutter speed that can be selected is a 1/30 of a second option, which can only be used if the auto slow shutter feature is turned on. In contrast, the Canon HF S21 has less shutter speed settings, but it includes three shutters that are slower than 1/60 of a second.
You can't set shutter speed manually when shooting 3D content with the HDC-SDT750, but the camcorder does have an auto slow shutter option for 3D mode (and a separate one for 2D shooting).
White balance is basically the only manual control that can be set while shooting 3D video with the HDC-SDT750. In fact, the white balance options on the camcorder are essentially no different in 3D mode than they are in 2D mode. There are a few white balance presets, a manual white balance setting, and a WB shift option.
Gain control is tied to aperture on the HDC-SDT750. What we mean by this is that you cannot adjust gain manually until you've already opened the aperture on the camcorder all the way. There's no way to specifically select gain adjustment on the camcorder either (which is part of the reason you have to adjust aperture first). Still, despite this factor, the HDC-SDT750 (along with other Panasonic models) has some of the most plentiful gain controls we've seen on a consumer camcorder. Sony and JVC cams don't let you adjust gain manually, while Canon's high-end models offer auto gain limiter features.
**Color & Image Controls***(7.5)*
**Other Manual Controls***(5.5)*
Still Features
The advertised 14.2-megapixel still image capability on the Panasonic HDC-SDT750 is a bit misleading. The camcorder's total pixel count is just 9.15 megapixels, which means that any of its still photo resolution settings that have higher pixel counts than 9.15 megapixels are interpolated. For example, those images—like the camcorder's 4608 x 3072 still image mode—won't have more pixels or detail in their images than the 3600 x 2400 still image option (but they will be physically larger when viewed on a computer).
What this all boils down to is that the Panasonic HDC-SDT750's true maximum native resolution for still images is its 3840 x 2160 size option (captures at a 16:9 aspect ratio). There are plenty of other options on the camcorder that capture still images at a native resolution, but there's also a number of interpolated sizes (everything above 9.15 megapixels). So, does any of this really matter? Not exactly. As long as you take photos with one of the larger settings you should get similar quality out of your still images. Besides, if you're really that concerned about still image quality, you should probably be using a dedicated digital camera instead of a video camcorder to take photos.
The Panasonic HDC-SDT750 did an excellent job in our still color test, producing numbers nearly identical to what we saw from the HDC-TM700. The camcorder managed a color error of just 2.6 with a saturation level of 103%. These values are even better than what the SDT750 registered in our video color accuracy tests (which were also very good). (More on how we test still color.)
All of the camcorders shown below earned top-notch color accuracy scores in this test. You can see sample images with our color comparisons below. Each camcorder captured vivid colors (all had saturation levels around 100%) and each had color error scores below 3.75.
Noise levels on the HDC-SDT750's still images averaged 0.8%, which is not bad for a camcorder. Again, this noise level is essentially identical to what we measured on the HDC-TM700 (0.81% noise). The Canon and Sony models both had more noise in their still photos. (More on how we test still noise.)
Still sharpness was something of a disappointment on the HDC-SDT750. The camcorder measured a horizontal sharpness of 1591 lw/ph with 20.7% oversharpening and a vertical sharpness of 895 lw/ph with 19.8% undersharpening. These scores are far lower than what the Canon HF S21 and Sony HDR-CX550V were capable of, which leads us to believe that a single, large image sensor helps produce sharper still images (although the SDT750 schooled the competition in our video sharpness test). (More on how we test still sharpness.)
Handling & Use
Playback & Connectivity
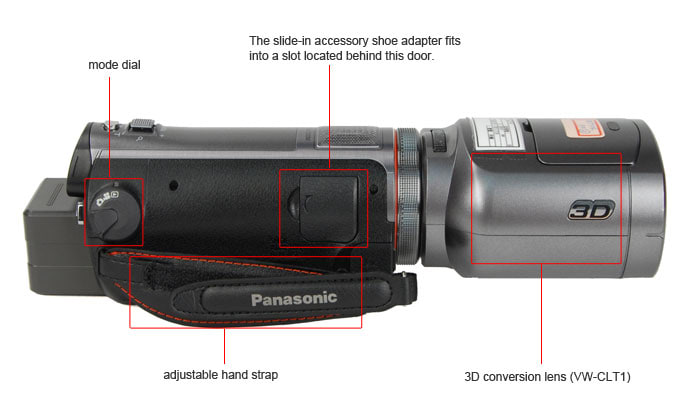
There's a small mode dial on the side of the HDC-SDT750 that allows you to switch between playback, video, and photo modes. Playback mode on the camcorder is fairly normal: clips are arranged as small thumbnails and you tap on said thumbnails to play your video back full-screen. The only confusing thing about this setup is in its organization. 1080/60p clips aren't displayed with the 60i clips as thumbnails, and you must click on a few little icons and menu options to find them. We're also not very impressed with the VCR controls on the SDT750, which are displayed on the bottom of the LCD during playback.
For playing back 3D content shot with the SDT750, you must view the clips on a 3D-capable television. Depending on what 3D TV you use, the television may or may not detect the videos as 3D automatically and display them as such. We viewed 3D clips on the Panasonic TC-P42GT25 TV, which immediately recognized which videos were in 3D and displayed them appropriately. An added bonus of this HDTV was its SD/SDHC memory card slot, which allowed us to playback clips directly from that (including 3D clips), without having to connect the camcorder to the television.
The HDC-SDT750 has the same connectivity features as the Panasonic HDC-TM700. Inside the camcorder's LCD cavity you'll find a collection of ports covered by a flip-down door. Behind this door is an HDMI terminal, a USB port, an SD/SDHC/SDXC card slot, and a Multi-AV port that supports both AV and Component output.
On the right side of the camcorder, near the front, you'll find an external mic and headphone jack. These ports are fairly well protected by a plastic cover, but the hand strap on the right side does get in their way at times. Behind and above these two ports is another cover that conceals the accessory shoe slot. You cannot insert accessories directly into this slot, but you must instead install the slide-in shoe adapter first (then you can mount accessories to it). We like that this side-mounted slot keeps accessories out of the way from your fingers, but it is also very easy to lose the slide-in adapter... and if that happens you're out of luck until you purchase a new one.
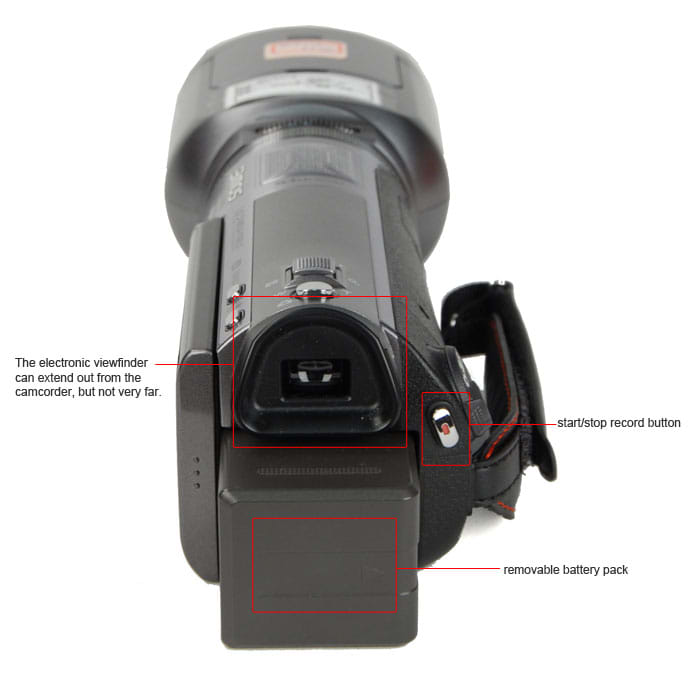
There's one more port on the back of the HDC-SDT750, but you must remove the camcorder's battery in order to find it. When you do so, you'll see a small DC-input port that allows you to run the camcorder off of wall-power. The problem with this setup is that you must remove the battery pack in order to switch power consumption over to the AC adapter. This means if you start a long shot while on battery power, and your battery becomes depleted, you must stop recording in order to switch over to the wall-plug. It may be a minor nuisance, or an issue that isn't very likely to come up, but it is a notable problem nonetheless.
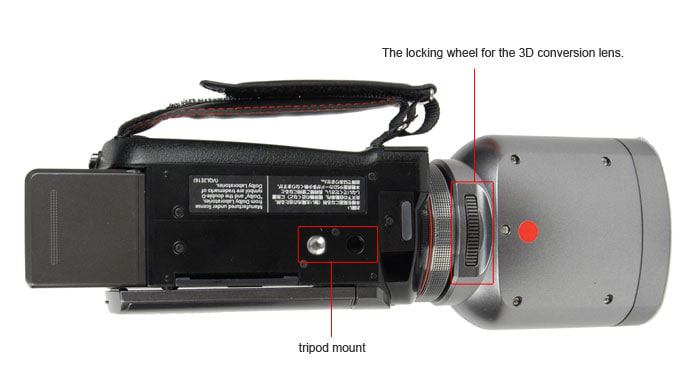
When considering the connectivity features of the HDC-STD750 we must also note the camcorder's 3D conversion lens, although this "feature" should be readily apparent to anyone purchasing the camcorder. The conversion lens mounts to the front of the SDT750 and locks in place by screwing into the filter thread. The conversion lens cannot be connected to previous Panasonic models (like the HDC-TM700) because the regular lens on the STD750 has two connecting slots that allow the 3D lens to fit on its front.
Audio & Other Features
There are a lot of audio features on the HDC-SDT750... but don't get your hopes up, audiophiles. None of the audio features on the SDT750 are all that new, by which we mean all of them were previously found on the HDC-TM700 and the HDC-HS700.
For starters, the HDC-SDT750 has a 5.1-channel Dolby Digital microphone located on the top of the camcorder as well as an external mic and headphone jack on the right side. Depending on how you hold the camcorder, you may have some trouble accidentally rubbing the built-in mic with your fingertips, so be careful.
As for internal settings, you can perform manual audio level adjustments, view audio level displays, adjust bass controls, and turn on an advanced wind cut feature called Wind Noise Canceler. You can also switch the built-in mic over to record 2-channel stereo or turn on its zoom mic feature (which allows the mic to "center-in" on audio coming from a subject the lens is zoomed into).
Pre Record
A common feature on consumer camcorders, Pre Record lets you capture a few seconds of footage before you press the record button. This footage is stored in a continual buffer, but it only saves the few seconds of video it captures before you start actual recording. Can be very useful for shooting action sequences or sports.
Auto Ground Standby (AGS)
AGS isn't the most useful feature, but it can be helpful for people who have a difficult time remembering to hit the record button when the want to stop recording. With AGS activated, the camcorder will automatically stop recording if it detects the lens as being pointed towards the ground for a period of time. Again, this can be useful, but it can also be an unwanted nuisance if, say, you actually want to film something on the ground.
Fader
An option on the function menu, fader allows you to add faders to your video clips (at the beginning or end).
Time Lapse Record
To capture motion over a long period of time (like a flower blooming) you can use Time Lapse Record. You select a recording interval from 1, 10, 30, 60, or 120 seconds, and the camcorder will capture one frame of video at each of those intervals.
3D Features
The ability to record 3D video is obviously the most intriguing and impressive feature of the HDC-SDT750. So, lets get right down to it and talk about the process of recording 3D content with the camcorder.
To begin, we must say that certain 3D videos we recorded with the SDT750 looked very good. If you mount the camcorder to a tripod or keep it very still and shoot subjects that are four to ten feet away, you will get some 3D content that is crisp and strong. 3D images popped very well in this manner, although we didn't get the effect of subjects "jumping" out from the screen that you sometimes see with 3D movies. The videos looked more like a funky diorama where you can see layers and the shape of the subjects within the frame. It is interesting and effective, but it may not be quite what you expect when you hear "3D capability."
We found that doing hand held shots in 3D produced undesirable results. The quick motion of the camcorder produced blurry, disorienting 3D content that gave us a headache more than anything else. Keeping the camcorder still is key to producing quality 3D content. It doesn't matter if your subject is moving at a rapid pace—our motion test looked great in 3D—but things came out best when our camcorder was kept perfectly still on a tripod.
You also need to make sure you have plenty of light when you shoot 3D video with the camcorder. Since you cannot adjust aperture or shutter speed manually, you'll need to rely on the camcorder's automatic controls to get the image you want (you also cannot focus manually). There is an auto slow shutter feature for shooting 3D and you may want to turn it on if you're capturing video in a low light situation. Still, we found low light images looked terrible in 3D, so our overall recommendation is to shoot outside where there is a lot of sunshine, or indoors with very bright light.
Calibrating the 3D conversion lens is strange and can be confusing, but Panasonic does provide good instructions (both onscreen and in the manual) on the matter. You don't have to calibrate the 3D lens every time you connect it to the camcorder, but it is a good idea to go through the calibration process so you can make sure nothing has changed dramatically (especially if it has been a while since your last calibration). The menu grabs below show the calibration process on the camcorder. There are 8 pages of instructions in all and Panasonic lists the instructions in a step-by-step manner.
The 3D conversion lens does not work with other Panasonic camcorders due to a slight alteration of the lens design and some internal processing that is present on the HDC-SDT750 (and isn't found on the HDC-TM700 or other Panasonic models). Once you connect the conversion lens to the SDT750 correctly, the camcorder will automatically recognize that the conversion lens is connected and it will begin the calibration process (if you haven't calibrated things in a while).
Videos displayed on the SDT750's LCD will not appear in 3D, but if you output the video to a 3D capable HDTV the clips should look fine. If you watch 3D content on a regular television, you'll see a split-screen of two identical videos with squished aspect ratios. We watched the 3D content on the Panasonic TC-P42GT25 HDTV and the television automatically detected the SDT750's 3D videos as being 3D (and displayed them as such).
Canon HF S21 Comparison
The Canon HF S21 and the Panasonic HDC-SDT750 retail for the same price (around $1400), but they have wildly different features and benefits. Where the HDC-SDT750 makes a splash is with its 3D capability and 1080/60p recording mode. The Canon HF S21, on the other hand, offers a more professional design, a native 1080/24p record mode, 64GB of internal flash memory, and two memory card slots.
So, which model gets you more bang for the buck? Unless you have a strong desire to shoot 3D video, the answer is probably the Canon HF S21. Of course, if you don't care about 3D content, you probably shouldn't be looking at the SDT750 in the first place (the Panasonic HDC-TM700 is a much better deal). The Canon HF S21 is the only consumer camcorder to offer a native 24p mode and it is also loaded with a PF30 and PF24 option as well.
With its abundance of internal memory, the Canon HF S21 is ready to go right out of the box, while you'll have to purchase an additional SDHC memory card if you want to use the Panasonic HDC-SDT750. Basically, what we're saying is that the price of the Panasonic is inflated here—and that high price is entirely a result of the novelty of 3D recording. The Canon HF S21 is pricey too, though, so you may be better off checking out some of the cheaper options out there.
Sony HDR-CX550V Comparison
Sony's flagship model for 2010, the HDR-CX550V, is a solid camcorder that is easy to use, but it lacks a few of the manual controls that you find on high-end models from Panasonic and Canon. The CX550V is cheaper than the HDC-SDT750, but its price tag is still a lot higher than that of the Panasonic HDC-TM700 and JVC GZ-HM1 (both of which are very good, high-end camcorders).
Is there a compelling reason to go with the HDR-CX550V? Well, it does have one of the better auto modes on the market, so it is good for beginners, and it is one of the few HD camcorders that also has the capability of recording standard definition video (a feature that is found on most Sony models). This ability to record SD video is probably the best thing about the Sony HDR-CX550V, and it makes the camcorder an excellent "bridge" model for those who are slowly making the switch over to HD.
The Sony does not have a 24p or 60p record mode—all of its video is captured at 1080/60i (except for the SD record modes). The camcorder does have a limited slow motion mode as well, but its quality is poor and the controls are very limited. And, although it should be obvious to most readers, the Sony HDR-CX550V cannot record 3D video. If that is the feature you're looking for, you really only have one choice at this point: the Panasonic HDC-SDT750.
As a 2D camcorder, the Panasonic HDC-SDT750 is better than the HDR-CX550V, but their difference isn't huge. The fact that the HDR-CX550V is $200 less makes it the better buy, even though the SDT750 did better in a number of our tests (and it has more manual controls). Remember, though, this is just 2D videography we're talking about.
Panasonic HDC-TM700 Comparison
Remove the 3D conversion lens from the HDC-SDT750 and we challenge you to find a significant difference between it and the Panasonic HDC-TM700. There really isn't much of any on the outside (except for a slight lens alteration to accommodate the fitting of the conversion lens), and on the inside the only difference is a new stabilization option and the lack of any internal memory on the SDT750.
In comparing these to models, we must reiterate what we've said throughout this review: if you have no use for recording 3D, the Panasonic HDC-TM700 is a far better deal than the HDC-SDT750. Comparing the list price of the two camcorders, you'll see that the TM700 is $400 cheaper than the SDT750—and the TM700 contains 32GB of internal memory compared to the SDT750's zero. This means, not taking into account the cost of memory, you're paying $400 for the 3D conversion lens on the SDT750. If that seems like a worthy expense to you, then you should splurge for the HDC-SDT750 by all means. Recording 3D is fun, it's unique, and the HDC-SDT750 is the only consumer camcorder out there that is offering it as an option. Plus, you're getting an amazing camcorder for 2D recording as well.
But, if all you want to do is record your life in old-fashioned 2D, then you should save yourself lots of money and buy the HDC-TM700 instead. The camcorder lists for $999, but it can be found for as little as $799 on the web. Recently, we even saw the TM700 listed for $599 on Panasonic's own website. Simply put, that's probably the best camcorder bargain we've ever seen. At this rate, Panasonic may be giving the HDC-TM700 away by the time Black Friday rolls around. Keep your eyes peeled.
Conclusion
Meet the tester

Jeremy is the video expert of our imaging team and Reviewed.com's head of video production. Originally from Pennsylvania and upstate NY, he graduated from Bard college with a degree in film and electronic media. He has been living and working in New England since 2005.
Checking our work.
Our team is here for one purpose: to help you buy the best stuff and love what you own. Our writers, editors, and lab technicians obsess over the products we cover to make sure you're confident and satisfied. Have a different opinion about something we recommend? Email us and we'll compare notes.
Shoot us an email