Performance
The PV-GS39 offers a native 16:9 1/6" CCD with a 800K gross pixel count (290K effective pixels in 4:3 and 380K effective pixels in 16:9). The F values for the iris are the same as the PV-GS31, which this is replacing– f/1.8 to 3.9 – but the focal length has grown from 1.9 – 49.4 mm on the GS31 to 1.9 – 57 mm on the GS39. The optical zoom has increased from 26x to 30x.
Viewing the image at 3000 lux, the picture is merely decent. The chart certainly appears bright enough, but the definition between colors is lacking. The yellow-green and green-blue portions of the spectrum tend to run together. There is also a surprising amount of noise, which did not appear in last year’s PV-GS35, a camcorder with the same imager size that we have also reviewed. Both of these models showed decent sharpness – that is to say, satisfactory sharpness for a 1/6" chip – but the graininess present across the entire picture, and most evident in the red-orange-yellow colors, is a little disheartening. Finally, notice the "jaggies" on the upper right border and lower left border of the color chart. This performance indicates a downgrade from the GS35 we championed last year.
**Video Resolution ***(9.8)*
The Panasonic PV-GS39 was tested for the resolution of its video using Imatest Imaging Software. In order to test this, video was taken of a standard resolution chart in both 4:3 and 16:9 modes. At it’s best, in 4:3 mode, the camcorder yielded 296.2 lines of horizontal resolution and 331.4 lines of vertical resolution, totaling 98160.68. In 16:9 mode, the camcorder produced 385.7 lines of horizontal resolution, and 321.8 lines of vertical resolution, with 0.726% clipping, yielding 124118.26. Clipping occurs when the software determines that the exposure is too high, or in this case, too low. This can result in inaccuracies of the resolution score. It is a problem that can occur with lower-end camcorders, or sometimes with even good camcorders that are overly-contrasty.
**Low Light Performance ***(4.75)*
The PV-GS39’s low light performance was a mixed affair. From what we’ve seen, manufacturers tend to take one of two roads: either their camcorders can retain color information at the cost of sharpness and noise, or they can retain sharpness at the cost of color information. Of course, the compromise has a myriad of gray areas (no pun intended), but this is often the breakdown. Panasonic, in this instance, has chosen to sacrifice noise reduction for color.
At 60 lux, certain colors are still bright, like yellow and green. Red, however, takes a hit. The grayscale is still defined, but the whites are significantly darker. Noise has definitely increased. However, when you compare the images to the ones from the PV-GS35 of last year, the sharpness actually looks a little better. And although the grain is slightly more pervasive in the GS39, it is also a finer grain, which is a marked improvement.
Panasonic is generous enough to offer manual gain control, from 0dB to 18dB. In auto mode, the GS39 had already raised the gain to approximately 12dB. Above is an example of shooting in 60 lux with the gain manually bumped up to 15dB. Note the steep loss of sharpness in exchange for a relatively modest color retention. We tried it again at 18dB, but the picture was mostly blown out at that point.
At 15 lux in auto mode, the GS39 footage became a bit of a mess. Noise completely dominated the picture, rendering it most likely unusable. Much of the color definition has also been lost. At this point, the auto setting had already maxed out the gain at 18dB, so there was no way to try and improve the quality through manual settings. This is when a slower shutter speed would have come in handy.
The GS39 shows an improvement over last year's GS19 and GS35. The colors are stronger all around, and the noise has at least remained stable.
Wide Angle* (9.0)*
Wide Angle measurements were taken of the PV-GS39’s 4:3 and 16:9 modes. In 4:3 mode, this model’s widest angle was 45 degrees, while it measured 57 degrees in widescreen mode (16:9). This additional screen capture indicates the the PV-GS39 does indeed offer true 16:9 widescreen.
Format
Compression* (8.0)*
For video, the Panasonic PV-GS39 engages in standard MiniDV compression, a compression format that thus far remains superior to the MPEG-2 compression of DVD camcorders presently available on the market. This should provide users with a higher quality of video at a lower price and in a form that is still more editable than footage current from DVD or hard disk camcorders. This will inevitably change as the technology becomes popular and evolves, but in the meantime, the PV-GS39 is able to produce image results which easily surpass those from competing formats. Stills from the GS39 are saved in the JPEG format.
Media* (8.0)*
The Panasonic PV-GS39 comes with two separate recording options, allowing the user to shoot still images with a resolution of 640 x 480 and record them to SD memory card, or to record video onto 6.35mm MiniDV tape. SD memory cards are not included with this camcorder. Both SD cards and MiniDV tape, however, are relatively common formats and should be easy to find.
Editing* (8.0)*
This camcorder does not come with editing software; for users to gain access to this additional option the purchase of the PV-GS59 will be necessary. That being said, the proprietary editing suites often included with camcorders are less than stellar and are oftentimes either rudimentary or unnecessarily laborious structures. The purchase of other editing software will be necessary if postproduction work is required or desired by the user.
Tour
The Front (6.5)
The front of the low slung PV-GS39 features the Panasonic 30x Video Lens which is positioned in the upper right-hand corner when facing the camcorder. The 30x optical zoom lens has a focal length of 1.9 to 57mm equivalency and an Auto Iris of f/1.8 to f/3.9. The filter has a diameter of 30.5 mm. Beneath the lens is the in-camera stereo microphone which is placed with little to no room between it and the lens. To the left of the lens users will find the in-camera video light, a less than flattering light which may be activated via a control positioned on the back of the camera body. This LED light will only work within an advertised 4.9 feet although even that distance is a bit overambitious. The manual warns that this light will cause vignetting to occur when shooting with conversion lenses.
Beneath the video light users will find the white balance sensor for the camera. Both the placement of this sensor, which could be blocked by a stray finger, and the effect of the LED video light could potentially produce inaccurate color readings as a result. At the bottom of the camcorder body beneath this sensor users will find the A/V port, which is covered by a well built port cover which is attached via a rubber tab located at the top of the port area. This arrangement will mean that if users are attaching an A/V cable the port cover also has the possibility of masking the white balance sensor.
**The Right Side **(8.75*)*
The right side of the Panasonic PV-GS39 features an interesting deviation from the standard top- or bottom-loading MiniDV cassette holder. With the Panasonic PV-GS39 users will find that this model loads its tapes from the side. Although the design appears as though the compartment will catch on the hand strap, it still always manages to open regardless of how tight the strap is. Hats off to the engineering team for avoiding that potential glitch. The fact that it's a side-loading rather than top-loading tape mechanism has little bearing on its usability. The cassette holder is opened via the Open/Eject switch located in the center of the camera. Above this switch users will find the playback speaker for the PV-GS39, located in a concave area of the camera body – another clever (or serendipitous) design choice which makes it impossible to mask audio playback even when holding the camera in the right hand. There are slightly raised horizontal lines running the length of the MiniDV compartment which should theoretically provide some sort of grip for the palm of the right hand.
At the base of the camcorder near the back face is another hard plastic port cover, which opens via a tab located on the bottom of the camcorder body. Once opened, users will find the USB 2.0 and DV Input/Output ports for the camcorder. This port placement, unlike the MiniDV compartment, is blocked by the hand strap. If the user is trying to both switch tapes and connect cables to these ports, they’ll find that a very restrictive layout. Running the length of the camcorder body, an adjustable right hand strap features a slightly padded interior and a Velcro lock.
**The Back ***(6.0)*
The viewfinder for the PV-GS39 is positioned in the upper left-hand corner and this Color Electronic Viewfinder is extendable, which will allow users to use this feature even with a battery pack in place below. To adjust the viewfinder the user must pull the viewfinder out from the camcorder body and turn the "Eyepiece Corrector Knob". This control is well sized and designed for ease of use, a functional device which is far superior to many of the diopter adjustment controls found on similarly priced camcorders. The actual eyepiece for the viewfinder is made of the same hard gray plastic as the right side of the camcorder. This unforgiving material will make using this feature less comfortable than the rubber eye cup found on the GS500.
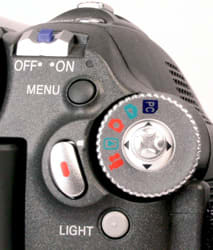
Beneath the viewfinder users will find the Battery Pack for the camera, which when removed via a tab on the bottom of the camcorder body, will reveal a port for the DC-in located on the inner right edge of this slight recess. To the right of the viewfinder users will find the Off/On switch. Next to the lower right corner of the On/Off switch a red LED will provide users with information regarding the power state of the camcorder. Beneath the LED and the On/Off switch users will find the Menu button for the PV-GS39, a small, slightly raised circular control.
To the right of this control users will find the mode dial with a central joystick which controls both settings and menu navigation for this camcorder. The mode dial will allow users to set the camcorder to Video Record, Video Playback, Still Image Record, Still Image Playback, or PC Mode. To the right of the mode dial is the Record button, a kidney bean shaped controller which is controlled via the thumb of the right hand. This control is positioned on a raised section of the camcorder body and is itself slightly raised as well. Beneath the mode dial and the Rec. button is the Light button, which controls the in-camera video light located on the front of the camcorder body. This button is small and sits flush with the surface of the camcorder.
**The Left Side ***(8.0)*
The left side of the camcorder is primarily consumed by the 2.7" LCD which will display both 16:9 native and 4:3 formats. When in 4:3, the picture is pillar boxed. Revealed when the LCD Screen is opened, the switch for Auto/Manual/Focus is positioned near the back of the camcorder’s LCD cavity and is small in size. This seems odd considering the lack of any other control on this surface. Located above this controller is the recessed Reset button. A slight light gray tab is located along the bottom edge of the body and can be flipped downwards to reveal an SD memory card slot which loads from the bottom of the camcorder.
The Top* (8.0)*
There are a few controls located on the top face of the PV-GS39, all on the right side near the back. Near the back edge of the camcorder, the Photo Shot button allows users to capture still images to memory card. Located in front of this control is the Zoom Toggle for the PV-GS39, placed for control with the right hand. This feature doubles as a volume control when reviewing footage in playback mode.****
**
**
Auto / Manual Controls
Picture & Manual Control
Automatic Control (5.0)
Though automatic controls on Panasonics are usually not the best, there is still an auto mode, which locks most controls on the camcorder from manual adjustment. The user can access this mode using the switch in the LCD cavity. (For better automatic control look to Sony camcorders, although keep in mind that this year Sony hasn’t made many improvements to their MiniDV line this year.) In addition to a full auto mode, users can use the Scene Mode settings for limited image control. They include : Sports, Portrait, Low Light, Spotlight, and Surf & Snow Modes. It is also still possible to access Backlight Compensation, Fade On/Off, Information, Soft Skin Mode, MagicPix, Perform Blank Search, and Recording Check Start while in auto mode.
The automatic controls of the PV-GS39 are mixed. The auto focus is good in most regards, but it fell apart in less than great lighting conditions, or when an image had too much detail. The auto exposure was great for major shifts, like from out the window to a dark corner of a room. But making subtler adjustments, like a subject shot in a room with mixed lighting sources, resulted in over- or under-lit scenes. Frequently, a wall or door with only a slightly reflective surface would blow out. The white balance did not adjust well automatically, and we were thankful for a good manual adjustment feature.
*
Overall Manual Control (7.0)*
Panasonic camcorders offer tons of manual control, and the PV-GS39 as the first 2005 model we've reviewed is no exception to this rule. The PV-GS39 offers manual control over focus, aperture, shutter speed, gain, and white balance, and even offers a pretty easy way to access them via the joystick located on the back of the camcorder. Certain settings like Gain and Aperture could do with some control improvement; a sliding rather than incremental scale would allow users to hold down the control and scan an entire range rather than pressing a button fifteen times to inch towards the end of the Gain range. Other than this slight control setback, the number of settings, the subtle changes to images they provide, and the responsive demeanor of all features will allow for fast and successful control of these settings and should encourage the use of the offered manual controls.
The joystick is used to make most manual controls happen. It moves in five directions: up, down, left, right, and in. Pushing it in will bring up or hide the manual control menu, which is split into five sub-menus (four if you are in automatic mode). The first menu, labeled 1/5, offers controls for fade, backlight compensation, and info. This last feature is immensely helpful for new users, and provides explanations for each control. To scroll to the next sub-menu, 2/5, push down on the joystick. Here you’ll find soft skin mode. On the third sub-menu is MagicPix night mode, on the fourth, Record Check, Blank Search (to find black spots on the tape), and on 5/5 are the iris, gain, white balance, and shutter speed controls.
There is also an administrative menu, accessed by pushing the Menu button. It controls features like 4:3 / 16:9 mode, Scene Modes, Wind Cut, Picture Quality, and Image Stabilization on / off, and similar features that do not typically need instantaneous access.
Zoom (7.0)
Last year, Panasonic MiniDV camcorders included tremendous optical zooms, blowing their competition out of the water. Panasonic is using the same tactic this year on both their MiniDV and DVD machines, though we should note that Sony and Canon are catching up. The PV-GS31 had 26x optical zoom. The PV-GS39 features the 30x optical zoom which further escalates the zoom ratings war, setting Panasonic ahead of the curve once more. Users who have larger hands, such as myself, may find that the re-design of the camcorder body will make these controls a bit too close to the palm of the hand, and that it will require a bit re-adjustment to really be able to take control of the zoom. That said, this toggle is actually placed nicely under the user’s middle finger and is a joy to handle, mostly. The camcorder did, however, provide fluctuating zoom speeds when trying to maintain a steady rate when moving from full telephoto to full wide angle.
***Zoom Power/Ratio (30.0)
*The Zoom Power/Ratio settings for the Panasonic PV-GS39 provide the option of shooting with 30x optical zoom only or engaging the digital zoom which will produce images which have degraded quality. The digital zoom options for the Panasonic PV-GS39 allow users to select between Off, 50x digital zoom, and 1000x digital zoom maximums.
Focus (5.0)
The Manual Focus setting for the PV-GS39 is accessed by flipping the Auto/Manual setting, which is in turn located on the left face of the camcorder body and hidden by the LCD screen. Once this small toggle is slid downwards and the manual mode activated, users can engage the focal settings by pressing the joystick situated in the center of the mode dial. The handling on the focal control is concise, allowing for smooth transitions to occur and settling accurately on the proper focal length without breathing. Unfortunately, there is no numerical gauge or even a scale to indicate where in the focal range you are. The auto focus tended to struggle when switching quickly between subjects of varying depths and subjects positioned under varied lighting. The switch in lighting finally produced the more problematic AF "breathing," causing the camcorder to take upwards of five seconds to settle on a focal depth in low light.
Exposure (Aperture) (6.0)
It is possible to manually control the iris adjustment for the PV-GS39, which Panasonic refers to as the "F Number," for F Stops. To access this control, the user must have the camcorder switched into manual mode via the manual control switch located on the left side of the camcorder. Once in manual mode the user must enter the joystick menu and select the Iris setting, which is located within the fifth menu on the small onscreen diagram. The Iris setting will then appear on the left side of the LCD screen and is controllable via the left and right arrows on the joystick. The settings for iris control are: Open (F1.8), F2.0, F2.4, F2.8, F3.4, F4.0, F4.8, F5.6, F6.8, F8.0, F9.6, F11, F14, F16 and Closed. Once the camcorder reaches Open, the PV-GS39 switches into Gain control and allows users to set the camera at the following Gain levels: 18dB, 15dB, 12dB, 9dB, 6dB, 3dB, and 0dB. The settings listed are the numerical levels listed on the LCD. There is actually one step between each of the listed Gain levels, and varying steps for each F Number numerically represented. The number of steps for the F Number settings will allow more sensitive aperture settings to be selected and will allow more accurate and nuanced shooting control.
*

Shutter Speed (7.0) *
The manual shutter speeds are accessed through the same onscreen diagram which represents access to white balance, gain, and iris, amongst other settings. The manual shutter speeds are located in the fifth menu screen, found when the user deploys the joystick. Once the shutter speed controls are entered users will be able to alter the shutter speed settings to shoot at rates of 1/60, 1/100, 1/120, 1/180, 1/250, 1/350, 1/500, 1/750, 1/1000, 1/1500, 1/2000, 1/3000, 1/4000, and 1/8000 of a second. This manual control is set up such that the user must press the toggle for each step within the shutter speed range, so getting from one end of the menu to the other will take longer than it would on an operating system that provided fluid scrolling. It's really great that Panasonic includes full manual shutter speed control, most manufacturers leave this out.
White Balance (7.0)
White balance control for the Panasonic PV-GS39 is located within the same diagram page located through the activation of the joystick. Once selected, the user will be able to select between white balance presets and a full manual mode. The preset options for white balance are Auto, Fluorescent, and Halogen. While these preset options aren’t going to be useful beyond the realm of well lit interior spaces, Panasonic has luckily made up for this deficit of presets by providing a quick-reacting and functional full manual white balance. To activate this control users merely select the Manual White Balance option and press the joystick up until the white balance indicator on the LCD screen stops blinking. In most instances, this took less than second to adjust.
Gain (7.0)
As mentioned during the Exposure/Aperture section of the Manual Control section, users can access the Gain control for the Panasonic PV-GS39 by using the joystick and entering the onscreen diagram for manual control. The Gain control may be found within the Iris Adjustment menu. The Iris Settings permit control over both "F Number" and Gain, although they do so via different menu structures. To begin gain control the user must merely enter the Iris section and press the joystick right and left to shift the gain levels for the camcorder. There is one step between each numerical gain level listed on the left side of the LCD screen. Settings displayed for dB are: 18dB, 15dB, 12dB, 9dB, 6dB, 3dB, and 0dB.
Other Manual Control (0.0)
There are no additional manual controls on the Panasonic PV-GS39; however, due to the reasonable price range and the immense number of manual control settings offered, the user of this camcorder shouldn’t be disappointed by what Panasonic has provided.
Still Features
Still Features* (6.5)*
There are very basic still image controls available on this camcorder. Users can shoot still images with a maximum resolution of 640 x 480 in JPEG format to SD memory card. These images may be saved with two compression setting options (High or Normal). Still images are captured via the Photo Shot button which is positioned well on top of the camcorder. There is no in-camera flash and an SD card is not included in the box, which is the case with some hybrid camcorders now on the market. Users will find that there is an option to shoot in "RapidFire Consecutive Photoshot" mode, which is essentially a burst mode with a long-winded title. The burst mode on this camcorder allows users to shoot 10 images in fairly quick succession. The best thing about the PV-GS39’s still mode is that all the same manual controls are available here: iris, gain, shutter speed, and white balance, in addition to soft skin, backlight compensation. Also, this camcorder can take stills in 16:9 mode. Unfortunately, it employs a crop and zoom method that curtails the resolution down to 640 x 360. Scene modes are also accessible when shooting in still mode and users can choose whether to have an audio sample of a shutter effect emitted when images are captured.
Still Resolution* (1.0)*
The Panasonic PV-GS39 was tested for its resolution when taking stills, using Imatest Imaging Software. The camcorder is limited to 640 x 480 stills, which significantly cut its chances of scoring well in this category. In fact, we were not able to obtain stills that did not clip when run through Imatest. Clipping occurs when the software determines that the exposure is too high, or in this case, too low. This can result in inaccuracies of the resolution score. It is a problem that can occur with lower-end camcorders, or sometimes with even good camcorders that are overly-contrasty. We increased the exposure three times, finally reaching 6035 lux, and the image still clipped. According to Imatest, the resolution score of the PV-GS39 is 104281.2, with a clipping of 0.856%.
Still Performance* (3.25)
*The PV-GS39 is not a still camera replacement in sense of the term. While it has a number of great features, like shutter speed, iris control, gain, and the whole lot from the video mode side, a feature set doesn’t do a thing when your still resolution is 640 x 480, or in the case of the 16:9 mode, 480 x 360.
At 3000 lux, the same light reading as our video performance test, the GS39 produced a dull, grainy, and slightly out of focus still picture. It reproduced none of the "popping" colors found in the video. Vibrant green looks like pea soup. The reds, oranges, and violets are far too muted. Only the blue looks in terms of color performance, and even that has a lot of noise. And unlike the video performance, this noise is not quite so fine grained. A poor performance all around.
Compared to last year’s GS35, the still performance has serious degraded. The GS35 is a little more saturated and a lot sharper. The only thing the GS39 has going in its favor is stronger white tones. Last year’s ZR300’s, another comparable camcorder, also produced much better stills. While nearly as noisy, the picture was overall more crisp, and had more vivid colors.
Handling and Use
**
Ease of Use*** (6.5)*
Overall this camcorder excels in ease of use, with simple to use external controls positioned for fast activation without consternation. There are a few areas which could do with improvement; the placement of the Menu button is the largest area of concern, at least for me. It’s placed perfectly in the center of a number of other external controls and positioned in such a way that my thumb could not reach it. Others at CamcorderInfo.com did not share this concern, but it’s worth noting. Instead, I had to use my left hand to activate it, even though the button is within millimeters of controls that are comfortably used by my right.
However, the administrative menu structure is simple to navigate, with full text subsections present throughout. The diagram that serves as the interface for manual control navigation is a bit tedious at first, with only symbols used to represent different settings, although over time these shortcut images should become familiar and easy to use. Thankfully, Panasonic has added the new Information feature, which explains the purpose of each icon when you turn it on. This should prove to be very popular with first time users.
Finally, options which occur across a range (like F Numbers) cannot be easily navigated; every incremental movement requires one individuated nudge with the joystick. This can get very tedious in adjusting, say, gain, which has upwards of 30 increments. If it were possible to merely hold the joystick and scroll through these settings, this joystick control and diagram would be a great way to move through all manual control settings. On the bright side, external controls are well sized and shouldn’t blend in with the surface of the camcorder body.
By comparison, the menus on a Sony camcorder are all accessed via touch screen LCD. This may sound great at first, but it presents a load of problems. First all, the menu often takes up the entire screen, which blocks the picture you're trying to correct. Also, you've just gotten your greasy fingers all over the only tool you can use to judge image quality. Finally, a touch screen LCD means having the LCD open more often, which results in a shorter battery life. A JVC menu, by contrast, is takes up about half the screen, so you can still see what you're doing.
Handling* (8.5)*
The PV-GS39 handles all manual control and playback through the menu interface, which isn’t the most effective in terms of efficiency; however, the joystick should provide users with a controller that easily navigates this logical system. The joystick arrangement is better than navigation with a four-way touchpad controller, and much better than the system on, say, the Hitachi DZ-GX3300A, and many other DVD and MiniDV camcorders which hide manual controls on the panel covered by the LCD screen. That system means users have to open the LCD (and not conserve battery power) to use manual controls. Panasonic however gives users the option of using the viewfinder as well as having manual control, which was a much smarter move.
The zoom toggle is well placed for users with small and average sized hands, but my hands are on the large side and I personally had a small problem with the toggle placement. I had to either uncomfortably curl my fingers or adjust the strap looser for a less safe holding position. Also and oddly, the only control not comfortably accessible is the Menu button. It’s placed on the right half of the back face but is only accessible with the left hand. It’s placed perfectly to be just out of reach otherwise.
Portability* (7.5)*
The Panasonic PV-GS39 has reasonable dimensions that will allow the user to hold this camcorder in one hand during casual shooting and enable easy transport. The camcorder weighs approximately 0.24 pounds and is approximately 3 inches wide, 4.75 inches in length, and 2.75 inches in height. The measurements provided with the manual are a little different; the camcorder is reported as having dimensions of 2 6/16th x 1 4/16th x 3 9/16th inches, which are overly slimming. However, even considering its actual dimensions, the PV-GS39 is a compact low slung camcorder that will easily fit in a bag or large purse when not in use and shouldn’t be seen as a burden during travel.
LCD/Viewfinder* (6.5)*
The Panasonic PV-GS39 features a new 2.7-inch LCD. The hinge mechanism that attaches it to the body is… interesting (to put it diplomatically). The LCD swivels around a plastic anchoring point which is then connected to the camcorder body via two plastic arms. With so many small plastic parts and the longer LCD, it seems that it would now be easier to snap the LCD off during accidental mishandling. Manipulating it, and feeling the give, increased this impression. The LCD is able to swivel 270 degrees and may be flipped 180 degrees so that subjects facing the camcorder can monitor themselves as they are recorded. When the LCD is flipped, the image on the screen is automatically flipped as well so that it may be viewed properly. The screen can also be rotated and returned to the camcorder body with the LCD facing out.
The user of the Panasonic PV-GS39 may also choose to use the Electronic Color Viewfinder. This viewfinder can extend from the camcorder body about 1.5", which means that the face of the user will not be uncomfortably pressed into the body of the camcorder in order to use the viewfinder. The functionality of this feature is also heightened by the placement of manual controls on the exterior of the camcorder body. Often manufacturers will place manual control settings under the LCD screen, making it essential to open the LCD when making changes to image parameters. With the PV-GS39 this won’t be an issue; all manual control access is readily available whether the user is favoring the LCD or the Electronic Color Viewfinder. The eye cup for the viewfinder however is made of uncomfortably hard plastic which appears to be the same material used on the right side of the camcorder body. To adjust the optics of the viewfinder, users must manipulate the well sized and easily used Diopter Adjustment feature located on top of the viewfinder, revealed when the EVF is pulled from the camcorder body.****
Battery Life* (10.2)*
We tested the PV-GS39’s CGR-DU06 battery for shooting duration by leaving the camcorder recording continuously without engaging any of the manual controls. The EIS was turned off, and all controls left in auto. The tape was changed once during this process, and we plugged in the DC power to do so. In total the battery lasted for an outstanding 101 minutes and 59 seconds.
VCR Mode* (6.5)*
The VCR mode provides a number of options that can be used prior to exporting footage from MiniDV to PC or another viewing device. Once the Playback Mode has been engaged via the mode dial, the accessed VCR mode allows users to control standard Play, Stop, Pause, FF and Rewind controls through the cardinal directions of the joystick controller. To adjust audio levels during playback, the user engages the zoom toggle to either raise or lower these levels. To play back still images, users must switch to the Memory Card Playback Mode; they can then start and stop slide shows with the up arrow, erase images via the down arrow, play back one image with the left arrow, and move forward among successive images with the right arrow. To view multiple thumbnail images users will need to slide the zoom toggle once to the left. This will prompt six still image files to be displayed as thumbnails on one screen.
Audio / Playback / Connectivity
Audio* (4.0)*
The PV-GS39 does come with some audio control options although there is no Mic-in port for this camcorder. This is unfortunate; even with a 1 chip in this price range, the inclusion of a Mic-in means the option for an external mic, which when used offers an immediate and noticeable improvement in audio. Instead, the PV-GS39 provides an in-camera stereo microphone placed on the front face beneath the camcorder lens.
The audio control options can be found in both the Basic and Advanced menus, which may be accessed through the Menu button. Within the Basic Menu users will find the Wind Cut option, a feature which functions as a High Pass or Low Cut filter that cuts out lower frequencies produced by wind hitting the camcorder’s microphone. It is also possible to choose whether the audio is recorded at 12 or 16 bit, and it is possible to select the zoom microphone to work in tandem with the zoom level of the camcorder. This feature as noted by Panasonic, "may not work effectively if the surrounding noise is too loud." This restriction indicates that this feature effectively takes the audio signal level and raises it in order to secure otherwise diminished audio levels.****
Ports* (4.5)*
There are several port areas located on the body of the Panasonic PV-GS39 which allow users to connect this camera to a number of playback and import systems. On the front of the camcorder an unlabeled and indistinct port cover blends into the surface so well it may be hard to find at first. Underneath this port cover users will find the A/V out port. There is another port cover positioned horizontally on the bottom right side of the camcorder for the DV (FireWire) and Full Speed USB ports. This port cover is easier to find but is positioned awkwardly when the MiniDV compartment is opened. Also, because of the port placement these ports are slightly covered by the hand strap. In addition, the port cover is large enough and connected in such a way that access to these ports becomes difficult. The port score takes a big hit here for the DC power jack's placement, which is behind the battery. This means that it is not possible to plug in power without shutting down and removing the battery. You'll either have to plan well or start with DC power from the beginning if you don't want to miss anything while shooting.
Other Features
Widescreen/16:9 Mode* (7.75)*
The widescreen or 16:9 setting for this camcorder is a native 16:9 format which is displayed fully on the 2.7-inch LCD screen. The user may choose to engage a 4:3 aspect ratio by entering the Basic Menu and selecting the Aspect setting. The inclusion of a 16:9 feature is great; many one chip models still shoot in 4:3 and at best offer a crop and zoom pseudo-Widescreen setting. Native 16:9, on the other hand, means that when shooting in the widescreen, the full width of the chip is used. ********
Scan Rates/24P* (0.0)*
The scan rate on the PV-GS39 is the standard 29.97 fps. For 24P or other frame rate setting options, consumers should expect to enter into a higher price range and deal with 3 CCD machines.
Other Features* (7.0)*
*Fade On/Off *- This setting lets the user of the PV-GS39 fade in and fade out images at the beginnings and ends of recording periods. While the results don’t have the quality found with fades on film, this feature is functional and will allow for some user play to occur with picture.
Backlight Compensation - The Backlight Compensation feature will let the image adjust to subjects who are being lit too strongly from behind, a situation which will otherwise throw the front plane recorded by the camcorder into deep shadow. In our testing, this feature did not perform very well at all. Our advice: find a better place for your subject to stand rather than relying on the camcorder to correct the picture.
Soft Skin Mode - The Soft Skin Mode is located within the same onscreen joystick diagram which may be accessed by pressing the joystick in and selecting the Soft Skin setting on the second menu. This feature will allow "Skin Tones" to be recorded with a softer tone and more flattering results which will obscure blemishes and flaws. However, it should be noted that this is only beneficial for a certain range of skin tones. This is a common aspect amongst all camcorders that have a soft skin mode. Be sure to write the manufacturer for more information on this feature.
*MagicPix *- The MagicPix feature on the Panasonic PV-GS39 allows users to shoot color images when experiencing situations that provide low or no light if use of the Video Light is neither feasible nor desired. The MagicPix feature tended to wash out images and produces stuttering slow video in a manner that Panasonic terms "time-lapse-like". It is still possible to adjust the focal depth, but white balance, shutter speed, and scene mode settings may not be manipulated by the user. Panasonic goes on to state that this feature slows the charging time of the CCD up to approximately 30x usual speed and will result in images that often display white dots on final footage. According to Panasonic these white/bright dots, though visible, are "not a malfunction". Also, the image stabilization is automatically disengaged when this feature is activated.
Wind Noise Reduction Function - This feature provides a high pass filter to audio recorded by the Panasonic PV-GS39, which will allow for higher frequency audio to pass through while blocking the undesirable low tones created when wind hits the microphone.
*Web Camera Feature *- The Web Camera feature may be engaged by connecting the Panasonic PV-GS39 to PC via the USB port located on the right side of the camcorder. Users can then send video and sound from the camcorder to third parties via the network or Internet, opening up a number of fun options to consume an afternoon.
Comparisons / Conclusion
Comparison
Panasonic PV-GS31

The Panasonic PV-GS31 was released last year by Panasonic and provided users with only 26x optical zoom, a slightly smaller 2.5-inch LCD screen, a lack of 16:9 screen resolution, and a top-loading larger camcorder body. The actual image sensor size and resolution has not changed on the new PV-GS39, nor have the ports. There are also the same manual control options and presets. Panasonic did however improve upon a more complicated menu structure this year with the PV-GS39’s joystick method, providing users with easier navigation. Our pick: the GS39.
*Panasonic PV-GS59
*The Panasonic PV-GS59, new this year, is not going to provide users with a larger CCD, a mic input, or S-Video port; however, it will give users a few more playback control options, an editing software suite, Hi-Speed USB 2.0, and audio dubbing. Whether or not the extra $30 that will be spent to get these features is worth it depends upon the user’s needs. If you don’t intend to use the PV-GS39 camcorder as a web camera and you already own editing software or an Apple with a program such as iMovie, then buying into this upgrade probably doesn’t make a whole lot of sense. Frankly, we're torn on this one.
Panasonic PV-GS29
The Panasonic PV-GS29, also new this year, and the bottom-end model in the MiniDV line, definitely has a more limited feature set for users: it restricts still images to MiniDV tape, provides a smaller 2.5-inch LCD, no USB port, and no native 16:9 format found on both the PV-GS39 and the PV-GS59. That being said, this camera model will be more appealing to the budget consumer not concerned with these specific features but interested in manual control options. This camcorder has the same sensor size and resolution as the PV-GS39 and PV-GS59. Opt for the GS39.
*Sony DCR-HC26
*The Sony DCR-HC26 uses a similar 680K, 340K effective pixel 1/6-inch CCD with a smaller LCD screen measuring 2.5 inches. This model also has a smaller shutter speed range and only accepts Sony’s proprietary MemoryStick memory card format for still images. It does however provide USB, FireWire, and Composite A/V. Manual control over exposure and white balance is also possible with the HC26; the settings are comparable to those of the PV-GS39. Unlike the PV-GS29 and PV-GS39, this camcorder by Sony does come with editing software. It’s called Picture Package version 1.5. Definitely the GS39.
Canon ZR600
The Canon ZR600 has a higher effective pixel count of 450K when compared to the 340K provided with the PV-GS39, and it is also able to provide still image options which easily surpass those found on the PV-GS39 (it allows a maximum resolution of 1024 x 768). That being said, this model by Canon is equipped with a 25x optical zoom lens which is unfortunately a bit stunted when compared with the 30x zoom of the PV-GS39. The Canon ZR600 manages to trump the PV-GS39 when it comes to ports by providing not only FireWire and USB ports but also an often-used S-Video port for higher quality video than what is produced when footage is exported from a Composite A/V port. In addition to these features, Canon also manages to match the 2.7-inch LCD found with the PV-GS39. Unfortunately, consumers can’t expect to attain the same level of manual control as they could with the Panasonic models listed within the same price range. The ZR600 provides minimal control over focus, white balance and EV compensation, while restricting users from accessing full control over gain, shutter speed, or aperture. This is a close call. Try them both out and see what you think.
Who It’s For
Point-and-Shooters *(5.0)*
For the Point-and-Shoot user the PV-GS39 provides some compelling arguments for being a camcorder to examine twice. The basic menu structure is great, as is the opportunity to slowly enter into more manual controls as one grows accustomed to this camcorder’s structure.
Budget Consumers* (8.0)*
With an MSRP of under $350 to begin with, the PV-GS39 should be an appealing option to any budget consumer looking for manual controls, some basic hybrid functionality in their camcorder, and the opportunity to shoot in native 16:9 format.
Still Photo / Video Camera Hybrid* (3.0)*
For the user seeking hybrid capabilities this camera is surely a step up from the PV-GS29, which only records still images to tape. However, there aren’t any real shooing control options for still images and with the maximum resolution at 640 x 480 out of two resolution options, this camcorder provides only the bare essentials with an SD card.
Gadget Freaks* (3.5)*
The Gadget Freak isn’t likely to find this camcorder useful in expanding their geek status, although the 16:9 native shooting mode and the budget price make this a handy additional camera for the 4:3-based Gadget Freak who is looking for another inexpensive format option.
Manual Control Freaks* (7.0)*
The Manual Control Freak will definitely be satisfied, especially if operating under a budget as well. The Manual Control Freak will have their appetite satiated by a sensitive gain control, aperture control, shutter control, white balance presets with a manual option, manual focus, and 30x optical zoom.
Pros / Serious Hobbyists* (5.0)*
There wouldn’t be any real reason for the Pro or Serious Hobbyist to choose this camcorder. For this crowd the Panasonic 3 chip camcorders would make a lot more sense and provide options which may surprise, especially considering their reasonable price range.
Conclusion
As our first full review of 2006, we’re glad to see that the feature-heavy traditions of lower-end MiniDV Panasonics have not been lost. Of course, we always like to see improvements, but the PV-GS35 was a big favorite of ours last year, as was the PV-GS19. There are not many improvements, and Panasonic has definitely tinkered with imaging system. This year’s picture shows a sharper image but more fine grain noise. It’s a judgment to call to say which is better. For my money, at this price, I’m willing to accept some noise for the sharper overall image. We’re anxious to see if the upper-end Panasonic MiniDV cams have undergone the same changes.
The PV-GS39 ($349) is a great intro cam, and one you can grow into. The automatic controls are just good enough to get beginners to the point where they’re ready to start taking charge of image quality. At that point, a wealth of controls open up: iris, gain, white balance, and shutter speed are great ways to learn about exposure and quality control. More advanced user might be better off looking at the 3 CCD Panasonics, which we promise to review in very soon.
Specs/Ratings
{{manufacturer_specs_table}}{{raw_scores_table}}
Meet the tester
James Murray
Editor
James Murray is a valued contributor to the Reviewed.com family of sites.
Checking our work.
Our team is here for one purpose: to help you buy the best stuff and love what you own. Our writers, editors, and lab technicians obsess over the products we cover to make sure you're confident and satisfied. Have a different opinion about something we recommend? Email us and we'll compare notes.
Shoot us an email