
Performance
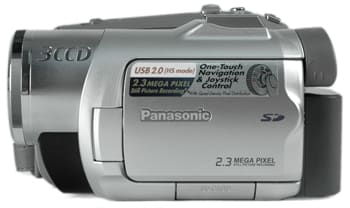
The Panasonic PV-GS180 comes equipped with three 1/6" CCDs, each with 800K gross pixels and 440K effective pixels in 4:3 aspect ratio and 380K effective pixels in 16:9 aspect ratio. A three-chip configuration means that each of the primary colors of visible light – red, green, and blue – are assigned to a chip, which makes for better color performance.
At 3000 lux (good, bright light), the GS180 had an excellent image. The colors are among the best we’ve seen this year, along with the other three-chip Panasonic camcorders. Unlike some lower-end camcorders with "strong" colors, these are not oversaturated. They look healthy and balanced.
The image is also very sharp looking, and managed to catch the finest details in which all but the high-end camcorders fail. Noise, which has been a problem with many Panasonics this year, was kept largely at bay. It’s not noise free, but noise won’t be something you notice.
The next model up, the Panasonic PV-GS300, had essentially the same image, which is not surprising, considering that the specs are same as the GS180. It produced the same great colors and the same sharp image.
The next model down, the PV-GS59 (review forthcoming), has a single 1/6" chip, and the difference in image quality is substantial. Firstly, the color performance cannot compare. The GS59 may be commensurate with its price class, but next to the GS180 it looks like someone hit a secret "de-saturate" button. Also, the image is not nearly as sharp looking. Despite having the same size chip (a three-chip vs. one-chip configuration tends to affect color more than sharpness), the GS59 could not capture nearly as much fine detail.
The Sony DCR-HC46, which we have already reviewed, was a bit of a disappointment. As with most Sonys, the colors were a little oversaturated, and favored the blues more than anything else, but that was not the problem. The image was also not quite as sharp looking as the GS180, but that was not the problem either. The problem was blue noise, which Sony had seemingly conquered until we found its insidious effects lurking inside the HC46. Not present in any other model in the MiniDV line, the HC46 may prove to be this year’s performance dud for Sony.
Finally, the Canon Optura 50, last year’s bottom-end model in the upper-tier Optura line, had an equally impressive color performance and fine detail capture. The Optura appeared to be slightly brighter overall, and with just a hint less blue in the image.
{column='Video Performance' models='Panasonic PV-GS300,Panasonic PV-GS59,Sony DCR-HC46,Canon Optura 50'}
Video Resolution* (15.8)*
The Panasonic PV-GS180’s video was tested for its resolution by shooting a standard ISO 12233 resolution chart, then taking stills from that footage and running them through Imatest imaging software. In 4:3, the camcorder produced 508.2 lines of horizontal resolution and 311.4 lines of vertical resolution, yielding an approximate resolution of 158253.48. In 16:9 aspect ratio, the GS180 produced 521.2 lines of horizontal resolution and 279.3 lines of vertical resolution, yielding an approximate resolution of 145571.16.
The chart below shows that the PV-GS180’s resolution was statistically the same as the PV-GS300 – no surprises there. It was also in line with most of the comparable camcorders from this year.
{column='Video Resolution' models='Panasonic PV-GS300,Panasonic PV-GS59,Sony DCR-HC46,Canon Optura 50'}
**Low Light Performance ***(5.5)*
The PV-GS180 has three CCD chips, which factor heavily into its color performance in bright light, but do nothing for low light. The biggest determining factor in low light performance is chip size. At a meager 1/6", the GS180 is on the losing side of the specs sheet.
In actuality, the GS180 did not look significantly better or worse than any other camcorder in its class at 60 lux. The vividness of the colors certainly took a hit compared to 3000 lux, but color differentiation was still very good. The camcorder also managed to maintain much of the fine detail that we found so impressive in bright light. The auto gain function was pushed up somewhere between 15dB and 18dB, which accounts for the decent picture, as well as the noise in that picture. Noise is a natural byproduct of gain, but we’re happy to report that it’s not too much of an issue at this light level.
By comparison, the PV-GS300 was the same, as it was in bright light. The specs are pretty much the same here, so we were not expecting a difference. The next model down, the PV-GS59, actually produced a slightly brighter picture. Though it has a single chip, it is 1/6", the same as the GS180, so we might guess that the slight increase in brightness is a function of a more eager auto gain. Again, though, it did not have nearly the same level of resolution that the GS180 did.
The Sony DCR-HC46 was much brighter, but the colors were not accurate. The resulting image looks like a bad combination of over-saturation and too much gain. The biggest problem, though, is the proliferation of blue noise at lower light levels. It’s too much too handle. The Canon Optura 50 was the closest competitor to the GS180 and GS300 – and it actually beats them by a slender margin. The image is brighter overall, and the color information is more clearly differentiated. Both of these are due to the Optura’s larger, 1/3.4" CCD.
The GS180, like all Panasonics this year, offers manual gain control in dB increments from 0 to 18. As you can see, the 15dB image is just a little darker, while the 18dB image is a little brighter. Gain boosts are a simple and effective way to get a better picture in low light if your aperture is opened as wide as it will go.
At 15 lux, the GS180’s noise levels shot up, and overshadowed most of the fine details. Colors are still recognizable, but the camcorder clearly hit its performance wall somewhere between 60 lux and now.
Again, the GS300 was much the same story. The GS59 was incrementally brighter overall, but the colors were not any stronger. In fact, the colors appear a little more washed out than in the GS180. The Sony DCR-HC46 maintained a little more fine detail, but lost most of its colors. The most interesting performer of the lot was the Optura 50. It once again managed to maintain a great level of its detail, but at the heavy price of its colors – the image is essentially in greyscale.
We do not show the 15 lux performance of the GS180 with manual gain because at this light level, the camcorder had already maxed out its gain scale at 18dB in auto mode. Overall, there were no great surprises here about its low light performance.
{column='Low Light Performance' models='Panasonic PV-GS300,Panasonic PV-GS59,Sony DCR-HC46,Canon Optura 50'}
Wide Angle* (7.5)
*The PV-GS180 serves up three aspect ratio flavors: plain vanilla 4:3, 16:9, and cinema mode. The camcorder does not support true 16:9, but anamorphically squeezes a 16:9 aspect ratio image onto the 4:3 native chip. This results in a significant drop in video sharpness in 16:9 mode. The third aspect ratio setting, cinema mode, applies a letterbox to a 4:3 image that results in a video frame with a 16:9 aspect ratio at the cost of image information from the top and bottom of the frame. Cinema mode is useful if you want to record a 16:9 video frame that will playback without distortion or cropping on a standard 4:3 TV.
Format
Compression* (8.0)*
The PV-GS180 uses MiniDV compression at 25 Mbps, a very mature algorithm that offers better video quality than the MPEG-2 format used by DVD camcorders. While Mini-DVDs can be played back immediately on a home DVD player and feature faster data transfer than tapes, they can’t yet compete with MiniDV when it comes to video quality. While the MiniDV will likely be replaced by HD and DVD in the next few years, this is a great time to buy a MiniDV camcorder because they offer more bang for the buck than any other format.
Media* (8.0)*
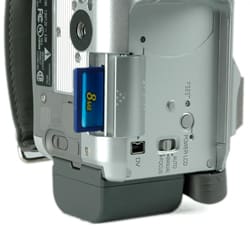
The PV-GS180 records video to standard MiniDV tapes, and captures still images to SD memory cards. The video compartment is located on the right of the camcorder, and loads from the top. The SD card slot is located on the camcorder’s underside, which is not a convenient placement because it precludes swapping SD cards when the camcorder is affixed to a tripod. Maximum still image resolution is 1760 x 1320, and the number of images that can be captured to a card depends on both the size of the card and the still quality setting. The PV-GS180 does not ship with tapestock or a memory card, but both formats are readily available at numerous retail locations including drugstores and electronics stores, or online.
Editing* (8.0)*
The PV-GS180 does not ship with video editing software, but numerous high-quality non-linear editing programs are available for free or at very low cost. Some of the best consumer-oriented editing programs are Avid’s FreeDV for both Windows and Macs, a freeware program, and Apple’s iMovie which is bundled free on new Macs. The PV-GS180 does not allow for in-camcorder video effects like fades or sepia, and we don’t think this is a drawback. With the advent of digital video editing tools that can do much more than any suite of in-camera editing features, there is no reason to work on video footage in-camera. For those who miss in-camera editing, the step-up Panasonic PV-GS300 does offer some effects and animations, as do the other camcorders mentioned in this article.
Tour
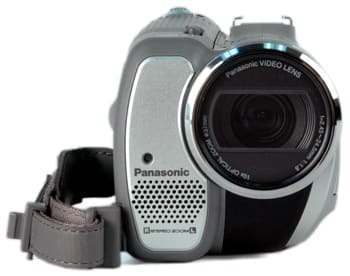
**The Front ***(8.25)*
The PV-GS180 isn’t pretty – Panasonic camcorders veer towards utilitarian as opposed to aesthetic elegance, and this model is no exception. While some manufacturers have chosen to slim down the width of their camcorders or adopt a more compact upright design, Panasonics are barrel-like and squat. This shape is especially prominent on the PV-GS180 when viewed from the front.
The 10 x optical zoom Panasonic lens occupies the entire upper right region of the camcorder’s front. What appears to be a silver-colored focus ring is actually a matte box release ring. Unlike most consumer camcorders, this Panasonic is fitted with a rectangular matte box that offers an unusual degree of glare shielding – a very nice feature. The matte box is threaded to accommodate 37 mm filters. The matte box can also be removed so that lens adaptors can be attached directly to the lens housing. A dark, opaque window below the lens conceals two sensors – white balance and remote control.
An onboard stereo zoom microphone is located in the lower left quadrant of the PV-GS180’s front. Just above the mic is a surprisingly small recording lamp, rounding out a sparse and efficient front-end.
**The Right Side ***(8.5)*
The right side of the PV-GS180, where the tape compartment opens, is ergonomically curved to provide a comfortable grip, and the barrel-like shape of the camcorder does feel very natural. In contrast to the rest of the camcorder body, the tape compartment door/grip region is made of a sturdy grey plastic that is marked by shallow grooves. Apart from giving this Panasonic camcorder a distinctive look, the grooves do offer some additional grip, particularly on top. The top-loading tape compartment opens on a hinge near the base of the right side, and easily clears the hand strap.
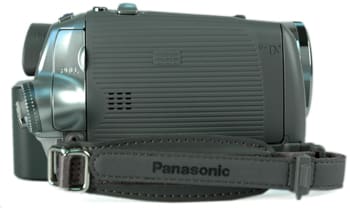
The hand strap itself is well-padded and comfortable, but runs parallel to the base of the camcorder rather than angled down towards the lens. Many camcorders including Sonys, Samsungs and some Panasonics feature an angled hand strap that orients the camcorder lens parallel to the ground without a bent wrist. Without that angle, pointing the PV-GS180 forward requires a slightly bent wrist which could become tiring over the course of a long shoot.
The last major component of the right side is a port cavity near the camcorder’s back. The cavity is protected by a sturdy and well-designed port cover made of hard plastic, and affixed at its base by a retractable connector. The port cover is easily opened by pulling on a small scalloped indent on its right edge, swings wide enough to permit full access to the cavity, and fits securely when ports are not in use. From top to bottom are an AV/headphone jack, a 3.5 mm microphone jack and a USB port. The AV/headphone jack must be configured in the menu as either AV out for analog playback to an external device or headphone out for audio monitoring.
**The Back ***(8.5)*
The back of the PV-GS180 is a tour de force in terms of fast-access functionality, and the combination joystick/mode switch serves as the primary interface for the camcorder’s many manual adjustments. The round mode switch extends out to the right of the back side, placing it in easy reach of the right thumb when the camcorder is handheld. The switch rotates between fixed positions for video record, video playback, still camera, still playback and PC modes. A joystick is located in the center of the mode switch, and is used to navigate menus within each mode by pressing up, down left or right. Pressing in on the joystick selects a menu item. This combination joystick/mode switch is an ingenious Panasonic development, and enables a user who is familiar with the interface to efficiently access and tweak the camcorder’s adjustments. Mastering the joystick does require some practice, however, as well as decent finger dexterity. In addition, the record button is located just to the left of the joystick/mode switch making it likely that the button will be pressed unintentionally from time to time.

Below the Record button is a port cover concealing an S-Video port. Like the port cover on the camcorder’s right side, this one is sturdy and well designed. To the left of the S-Video port is the expandable battery slot. The battery release is located on the underside of the PV-GS180, and operating it can tricky given the small size of the switch, and its out-of-sight location. The battery release location also makes it impossible to access when the camcorder is mounted on a tripod – a seemingly minor inconvenience that could prove costly. Sometimes getting the shot or missing it is a matter of a few seconds, and Panasonic should have allowed for battery release without removing the camcorder from a tripod.
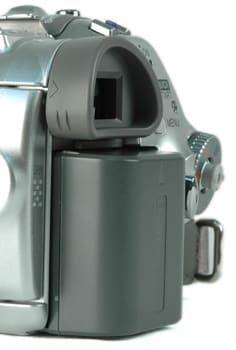
Above the battery is an extendible color electronic viewfinder that is about as good as one can find on a typical consumer camcorder today – in other words, terrible. This one does extend far enough back to clear the included battery, an area in which some viewfinders literally fall short. Like other consumer camcorder viewfinders, the PV-GS180 has a hard plastic eyepiece that becomes uncomfortable after a few minutes of shooting. In its favor, it is possible (just barely) to use this eyepiece without any light leakage from the sides by gently pressing it against your eyeball. It’s not a great fit, but it works better than most. A dioptric adjustment is located on top of the viewfinder.
To the right of the viewfinder, and above the joystick/mode switch are the Quick Start button and Menu buttons. At the far top right of the camcorder’s back is a small power indicator light.
**The Left Side ***(7.5)*
The main feature of the left side of the PV-GS180 is the 2.5" LCD screen, and the functions housed in the LCD cavity. The screen produces an excellent image that is very sharp and bright, but suffers from solarization when tipped at even a slight angle to the user. Sony is the one camcorder manufacturer that produces LCD screens that do not solarize – but they don’t have the crispness of the PV-GS180’s display. The Screen opens to 90 degrees from the camcorder body, rotates through 270 degrees, and can be folded LCD-out into the LCD cavity for viewing from the left side.

Inside the LCD cavity is button labeled Power LCD, which causes the entire LCD to brighten when pressed. A small green indicator light is illuminated when the screen’s brightness is increased. Below the LCD Power button is a switch for Auto and Manual modes. The top position of the switch places the camcorder in Auto mode, and the center position engages Manual mode. When in Manual mode, this switch is also used to toggle between Manual and Auto focus, by pressing the switch down. The downward position is not fixed but is a spring loaded toggle that returns the switch to Manual after being depressed. Below the Auto/Manual switch is a DV port, and just to its left at the bottom center of the LCD cavity is an SD card slot. Like the battery release, this slot cannot be accessed when the camcorder is mounted on a tripod.
The Top* (8.5)*
The most prominent feature of the top of the PV-GS180 is the zoom toggle, located near the camcorder’s back. The toggle is a spring-loaded slider that provides excellent zoom control when the camcorder is handheld. The placement of the toggle was slightly awkward for me, and was in-between my index and middle fingers – further forward than on most camcorders. Behind the zoom toggle is the still photo button, and at the camcorder’s rear edge is the Power switch.
At the front of the camcorder is the Open/Eject switch, which unlocks the tape compartment door. Once the door is unlocked, it must be manually pulled into its fully open position before the tape mechanism will eject the tape. A cold accessory shoe is located on the left side of the PV-GS180’s top, just forward of the viewfinder.
Auto / Manual Controls
Picture & Manual Control
Automatic Control (5.25)
No matter how many great manual controls are on a camcorder (and Panasonic does tend to have some good controls), solid automatic controls are hard to beat sometimes. Most users will find the PV-GS180’s auto controls satisfactory. Of course, starting off with great video quality is helpful. After that, you want a camcorder that can adjust quickly and accurately changing shooting conditions. The PV-GS300 offers automatic exposure, shutter speed, focus and gain.
A small switch located in the LCD cavity toggles the camcorder between manual and automatic modes. In auto mode, the camcorder shuts off access to most of the manual controls and part of the main menu. It’s not quite as drastic as the auto modes on Sonys, which preclude even the simplest tampering in an effort to "idiot-proof" it. Panasonic has taken the chance that you are not an idiot, so please do not undermine their trust.

The Panasonic PV-GS180's LCD cavity, which houses the Auto/Manual/Focus switch
The auto controls are accurate, thankfully. Rather than a immediate shift, the camcorder tends to ease into changes over a few seconds. The focus and exposure are the fastest, though the dark-to-light transitions are faster than the light-to-dark transitions. White balance is a little slower, but once it finds the right balance, it’s among the most accurate we’ve seen.
The manual control section below will explore the menu layout in more detail. For now, we’ll just say that the menu is split into two parts, the main menu and the manual control. The manual control contains some of those features we consider "automatic controls" that is, features that can be turned on and off with a touch to improve image quality. They include: TeleMacro (extends the zoom to 10x and adjusts the aperture for best close-up shooting), backlight compensation (boosts exposure overall to compensate for subjects with too much backlighting), Soft Skin Detail (recognizes certain skin tones and softens the focus), MagicPix (slows the shutter speed down below 1/60) and 0 Lux MagicPix (allows you to flip the LCD around and use it as a light source).
One last set of automatic controls, the Scene modes, cannot be accessed unless the camcorder is in manual mode. The Scene modes are tailored for tricky lighting situations where a beginner’s prowess might be surpassed. They include: Sports, Portrait, Low Light, Spotlight, and Surf & Snow.
*

Overall Manual Control (7.5)*
First, let’s explore the menu. There are two completely independent menus, the main menu and the manual controls menu (this is a common split in camcorders). The main menu contains all the administrative controls – like record speed, clock and language set – and some image quality controls – like Wide and Cinema modes, still picture quality, and the Scene modes. This menu is accessed via the Menu button, located on the rear, and navigated through with the joystick. The layout is very clear and understandable.
The second menu can be a little more tricky. Pushing in on the joystick brings up a small wheel in the lower right corner of the LCD. The tip of the joystick will glow blue once the menu is active. The menu is divided into three parts - 1/3, 2/3, and 3/3 – most with icons representing each feature. The icons are not self-explanatory, so you may want to keep the manual handy. Page three (3/3) of the menu has the real manual controls: white balance, shutter speed, aperture, and gain. The fifth major control, focus, is activated by pushing down all the way on the auto/manual switch.
Overall, the manual control suite is excellent. Panasonic does this better, in the consumer realm, than any other manufacturer by a long shot. The next best, JVC and Canon, both fail to offer gain, which is so convenient to use in low light shooting that you’ll never be able to do without it again. The PV-GS180 does not differ from the rest of the Panasonic line it its manual control suite, except for the maximum aperture. The PV-GS180 has a maximum F-stop of F/1.8. The top of the line model, the PV-GS500, has a larger F/1.6.
*

Zoom (7.0)*
The zoom controls on the Panasonic MiniDV camcorders are functional, but they’re not great. Rather than a raised toggle that feels like its bending back and forth, it uses a sliding switch that moves along a track. It moves well, so we can’t complain too much, just not as well as a raised toggle. You can get about three zoom speeds depending on how much pressure you apply.
Zoom Power/Ratio (10.0)
The PV-GS180 has a relatively modest 10x optical zoom and a 700x digital zoom. There are numerous camcorders in a similar price range that sport optical zooms significantly stronger than this camcorder, ranging up to over 30x . If zoom power is a primary factor in your purchasing decision, there are better options out there. On the other hand, the PV-GS180 offers excellent video quality and manual controls that trump most other camcorders on the market. The digital zoom can be disabled, or capped at 25x.
Focus (5.0)
Manual focus is engaged by pushing down on the automatic/manual toggle switch located inside the LCD cavity. A small "MF" icon appears in the upper right corner of the screen. In the lower right there are a plus and minus sign. You move the joystick left and right to adjust focus. When you’re satisfied, push in on the joystick and it locks the focus. Like nearly every consumer camcorder, there is no scale to indicate where in the focus range you are. And while we like this LCD screen, it’s really not large enough to make careful focus adjustments. Small focus errors in the small screen get much bigger on a TV screen. Our advice is to let the auto focus earns its keep; skip manual control unless you absolutely have to.
Exposure (Aperture) (5.5)
The PV-GS280 offers full aperture control, independent of shutter speed. The aperture control is located on page three of the manual control window, with a range of: F/1.8 (Open), F/2.0, F/2.8, F3.4, F/4.0, F/4.8, F/5.6, F/6.8, F/8.0, F/9.6, F/11, F/14, and F/16. There is a 1/2 step increment between each increment, noticeable by looking at the brightness of the picture, but not indicated in the onscreen text. Once the aperture has been fully opened, manual gain can be engaged.
*Shutter Speed (7.0) *
The PV-GS180 offers manual shutter speed, independent of exposure, with a range of 1/60, 1/100, 1/120, 1/180, 1/250, 1/350, 1/500, 1/750, 1/1000, 1/1500, 1/2000, 1/3000, 1/4000, and 1/8000. This wide array of choices should satisfy even the pickiest manual control enthusiast. Changes are made in the manual control menu via the joystick. No other manufacturer offers quite as good a range, or as simple an operation to change it.
White Balance (7.0)
The white balance options are also located in the manual control menu. There are only four settings here: auto, indoor, outdoor, and manual. Most manufacturers offer you a few more indoor or outdoor settings, but Panasonic has foregone them. Why? Probably because their automatic white balance is very good. But sometimes , you just need that manual touch. In those instances, the manual white balance is very easy to make. Just toggle to the icon and push up on the joystick. The screen goes black for a moment, and when it comes back, the colors should be perfect. The black screen in itself is satisfying. Too often in lower-end camcorders, it is difficult to tell if you’ve made the adjustment or not. There is no guesswork here.
Gain (7.0)
Like all Panasonics this year, the PV-GS180 does offer manual gain. It can be accessed only when the aperture has been fully opened (F/1.8) ranging between 0dB, 3dB, 6dB, 9dB, 12dB, and 18dB. There is a 1/2 step increment between each step. Gain is a great way to get a little extra color information when the auto control fails. We must say, though, that the PV-GS180 does seem to start in on the auto gain at pretty high light levels – around 100 to 150 lux – so there might not be much gain left to play with in low light levels.
Other Manual Control (0.0)
There are no other manual controls on the PV-GS180.
Still Features
**
**
Still Features* (7.5)*
The PV-GS180’s still features are favorably comparable to other camcorders in its price range. Stills are captured to SD card (not included), which loads awkwardly into a slot below the LCD cavity. They can be captured at 640 x 480, 1280 x 960, and 1760 x 1320 in either normal or high quality. When in video mode, you can also capture stills to the card, but only at 640 x 480. The camcorder has neither a flash, nor does it take wide angle stills, both of which are features of the PV-GS300.
Such large stills are possible from such small chips due to Panasonic’s Quad-Density Pixel Distribution. Pixel shifting is a type of interpolation in which an imaginary point between pixels is chosen and a light value is calculated based on adjacent pixel values. This is the same process that professional cameras use to increase resolution. It results is some pretty good looking pictures, but still not as good as a dedicated still camera would offer.
The still mode benefits enormously from the manual controls, which are carried over from the video mode. This includes aperture, gain, shutter speed, white balance, and focus, along with most of the automatic controls: backlight compensation, soft skin detail, telemacro and the Scene modes. Additional still functions include a timer (10-second delay) and RapidFire Consecutive Shot (640 x 480 only, up to 10 pictures at 0.5-second intervals).
Still playback is a simple operation, accessed by the mode dial surrounding the joystick. Stills take up the entire screen, and the joystick is used to advance, rewind, and begin or stop play of a slideshow.
Comparatively, the next model down, the PV-GS59, can only take 640 x 480 in 4:3 aspect ratio. It does however, offer the 16:9 aspect still of 640 x 360, useful as a novelty and not much else. The Optura 50 can take great-looking1632 x 1224 stills without interpolation, thanks to its large 1/3.4" CCD. The Sony DCR-HC46 takes stills up to 1152 x 864, though they are of poor quality.
Still Resolution* (4.4)*
The PV-GS180 was tested for the resolution of its stills by shooting a standard ISO 12233 resolution chart and running those stills through Imatest imaging software. At its best, shooting at 1760x 1320, the camcorder produced an approximate resolution of 441446.88.
As the chart below shows, the resolution score was lower than that of the PV-GS300, as the PV-GS300 is capable of capturing larger stills.
{column='Still Resolution' models='Panasonic PV-GS300,Panasonic PV-GS59,Sony DCR-HC46,Canon Optura 50'}
Still Performance* (6.5)*
With stills as large as 1760 x 1320, the PV-GS180 certainly seems to want to compete with your still camera. In reality, the three 1/6" CCDs can only produce an effective pixel count of 530K each. The 1760 x 1320 is larger than the native resolution, and is a result of Panasonic’s Quad-Density Pixel Distribution to appear larger (see the Still Features section above for further explanation).
From what we can see, the images look great. Even at its smallest, 640x 480, these stills are significantly better than those you’ll usually see from a camcorder. It looks very sharp, had no problem capturing the small details, and the noise was minimal. Color balance, which is typically the biggest problem with camcorder-generated stills, was surprisingly good. The greens were noticeably low, but overall, this is much more accurate than what we usually see.
Following the trend of video performance, the Panasonic PV-GS300 was much the same as the PV-GS180. The solid blue and red performance and lackluster green performance was also repeated here. The PV-GS59, with only one 1/6" chip, was darker overall, with a lot more noise and significantly poorer color performance. The gap in quality between the stills is as noticeable as it was in video performance.
The Sony DCR-HC46 had abysmal color performance, and rendered the stills nearly unusable. Almost duo-tone in a yellow-blue split, the picture was wrought with blue noise. Finally, the Canon Optura 50 had a slightly more even color balance than the PV-GS180, probably because the colors are equally muted, rather than just a weak green. The Canon had excellent fine detail capture, as well, even better than the PV-GS180.
{column='Still Performance' models='Panasonic PV-GS300,Panasonic PV-GS59,Sony DCR-HC46,Canon Optura 50'}
Handling and Use
**
**
Ease of Use* (6.0)*
All Panasonics are easy to use, after you’ve crested the initial learning curve. The time it takes you to do that will vary depending on your level of "techno-comfort." Do you fear setting the time on your VCR, or do you dive right in? The obstacle in Panasonic camcorders is learning the icons in the manual control menu and other places. The esoteric symbols – a flower, a radioactive cornstalk (turns out this is the windscreen symbol) – might require that you consult the manual before your first big shoot.
Once you’ve mastered the icons, it handles like a dream. I’m reminded each time I use a Panasonic that their joystick operation really is the best in the business. It’s fast, effective, large enough to get a grip on, and can be used for one-handed operation. The Sony touch screen has a lot of these qualities, but leaving greasy fingerprints all over the LCD is a drag. It also means that Sony camcorders require two hands. Canon offers either a jog dial or joystick, depending on the model, and the joysticks are nearly as good as the Panasonics. JVC also uses joysticks on some of theirs, but like Canon, they put them on the outer edge of their LCD panels, rather than located on the back of the camcorder, as Panasonic does.
Handling* (8.5)*
The PV-GS180 is a camcorder that has a considerable number of features packed into a small package. Despite its wealth of manual control options and ports, Panasonic’s engineers have managed to keep the camcorder’s handling generally intuitive and comfortable. This is a small camcorder, measuring 71mm (2.8 inches) wide x 73mm (2.9 inches) tall x 123mm (4.9 inches) long, and the barrel-like shape fits easily in the palm during hand-held shooting. Amazingly, Panasonic has designed the camcorder’s main inferface to be usable with one hand thanks to the integrated Joystick/Mode Switch.
I did find a few aspects of the camcorder’s design frustrating during hand-held shooting. The handstrap is not angled down towards the lens as on many camcorders, which forced me to cock my hand slightly backwards to keep my shooting axis parallel to the ground. Over time, this will add to hand and wrist strain. In addition, the zoom toggle was not positioned directly under my index finger, but fell in-between my index and middle finger if I also positioned my hand so my thumb could access the joystick. It should be noted that this problem is a curse of abundance. No consumer camcorder manufacturer makes so many controls accessible to one hand, but that hand will work hard if you plan on exploiting them all.
The joystick on the camcorder’s rear is the main interface device, and it works surprisingly well. The optimal interface solution is to place manual controls on a camcorder’s exterior, enabling one-button access. Prosumer camcorders with their larger bodies can accommodate myriad external buttons and switches for white balance, exposure, and other important manual controls. Consumer camcorders are much smaller, and manufacturers have therefore consolidated controls in menus, and assigned multiple functions to buttons and toggles. No interface solution is perfect: Sony’s touchscreens tend to buildup finger grease, and cannot be accessed with the LCD closed, JVC’s Everio touchpads are small and difficult to operate, and many camcorder interfaces are placed out of sight in the LCD cavity. We prefer Panasonic’s rear-mountedjoystick because it is easy to operate with one digit, its location is convenient for the user, and it works relatively well as a multifunction controller. For example, the joystick is used to adjust focus manually and works much better than touchscreens or touchpads in this capacity (though a true focus ring, found only on the PV-GS500 would be better still.)
Panasonic has developed a streamlined menu layout that keeps handling relatively intuitive, and its broken into an Administrative text-based section and an icon-based Manual section. The Administrative Menu is reached by pressing the Menu Button, located on the camcorder’s rear when the camcorder is not actively recording. Reaching this button, with only my shooting hand, was a stretch for me, but navigation within the menu is fast and easy using the quad-directional joystick, and its middle select function. The Manual Menu is reached by pressing the center of the joystick while in Record Mode, and appears in the lower right corner of the LCD screen. It’s also easy to move through, but the icons themselves require that you memorize their respective functions – they are not intuitive. Making the most of the PV-GS180’s manual controls thus involves a steeper learning curve than most other camcorders, but its worth the effort.
Portability* (5.0)*
The PV-GS180 is a small camcorder to be sure, but its not an ultra compact which makes it too big to comfortably fit in a pocket but easy to toss into a purse or day pack. It weighs in at 410 g, or .91 lb. Ounce for ounce, few camcorders on the market offer so many manual control features in such a small package.
LCD/Viewfinder* (5.5)*
The LCD screen on the PV-GS180 is measures 2.5-inches and has a modest resolution of 113,000 pixels, which is not a high pixel count considering some camcorders offer over 200,000 pixels on their LCD displays. Pixel count is not necessarily indicative of apparent image quality, and this camcorder’s LCD presents a very sharp and bright picture that looks better than Sony LCDs with a similar pixel count. Unfortunately, Panasonic screens do suffer considerably from solarization when their screens are viewed at even a slight angle. In addition, the 4:3 aspect ratio of this screen cannot accommodate widescreen mode without modifying the image. In widescreen mode, the entire image is letterboxed and in cinema mode, the image is cropped and zoomed. We’re not sure why Panasonic elected not to include the same 2.7" 16:9 screen that appears on the PV-GS300 and PV-GS500 on this camcorder, and its certainly a liability when it comes to framing shots. The LCD includes a Power LCD button that increases the LCD’s brightness, located in the LCD cavity. The user manual reports that Power LCD mode doubles the LCD’s brightness but will reduce battery life.
We have lamented the terrible quality of electronic color viewfinders on consumer camcorders, and manufacturers seem to treat them as vestigial organs given that LCD screens are much easier to use. Yet viewfinders are preferable in situations such as environments where a large illuminated LCD screen may be disruptive, on a very bright day, or when maximizing battery life is vital. For this reason, we believe camcorders deserve better viewfinders.
With this in mind, the PV-GS180’s viewfinder is quite poor – but is still better than most consumer camcorder viewfinders for a few reasons. By pressing your eye gently against the eyepiece, it is possible to block out ambient light from the sides which is useful when evaluating shots in bright sunlight. Many eyepieces don’t allow this because the shape of the eyepiece simply precludes light leakage. In addition, the joystick-based menu is available while using the viewfinder, a convenience that isn’t available in camcorders like the Sony HC-46 which utilizes a touchscreen menu interface. The viewfinder’s dioptric adjustment is just forward of the eyepiece. The PV-GS180’s viewfinder is not comfortable, it extends but does not pivot upward to provide a better viewing angle, but it is still better than many others on the market.
Battery Life* (8.2)*
The PV-GS180 ships with the CRG-DU06 battery. This is the same battery that comes with the PV-GS59. The more powerful DU12 battery ships with the PV-GS300. We tested the DU06 battery for endurance in continuous shooting. With the LCD open and no manual controls or zoom engaged, the PV-GS180 lasted for 82 minutes and 37 seconds (1 hour, 22 minutes, and 37 seconds). This is an average length of time for a MiniDV camcorder in this price range.
Audio/Playback/Connectivity
Audio* (7.0)*
The Panasonic PV-GS180 far surpasses most consumer camcorders in terms of its audio performance simply because it includes an external microphone jack and a headphone jack. Many consumer camcorders, including the Sony HC-46 have an onboard mic and nothing else, which imposes extreme limitations on audio recording quality. By including a mic jack on the PV-GS180, Panasonic has opened up a universe of microphone options allowing the camcorder to capture professional quality audio as well as decent video. The headphone jack enables users to monitor audio, an essential capability for situations when sound quality is critical. The headphone jack doubles as the AV out, and the jack’s function must be selected in the Setup menu.
The PV-GS180 also features a Wind Cut feature that reduces the buffeting sound of wind on the on-board mic. Wind Cut is a digital filter that blocks some of the low tones produced by wind on the mic’s surface, and will reduce overall sound quality so it should be used sparingly. A better option, in windy situations, would be an external mic fitted with a windscreen or blimp. The on-board mic also has a Zoom Mic function, a digital audio effect that gives the onboard mic a hypercardiod-like pickup pattern when zoomed in and an omni-directional-like pickup pattern when zoomed out. Zoom Mic is only an effect, but may prove useful for purposes of isolating sound when an external mic is not available. The PV-GS180 has a cold accessory shoe on which an external microphone can be mounted.
Users may also choose to record audio in either 16 bit or 12 bit modes. 16 bit audio is the highest quality setting, and is appropriate for most purposes. The 12 bit audio mode records audio at a lower sample rate and quality level, but enables in-camcorder audio dubbing with the optional remote control.
VCR Mode* (6.5)*
VCR mode on the Panasonic PV-GS180 is activated by switching the mode dial to the video playback icon. Doing this immediately brings up the video playback menu on the LCD which is actually a small map of the joystick-based VCR controls: Play/Pause is up; pressing left and right activate reverse and fast-forward respectively, and play is stopped by pressing down. The VCR menu can be hidden or revealed by pressing in on the center of the joystick.
The joystick is very easy to use, assuming you are holding the camcorder and is an extremely efficient way to move through a tape. This joystick orientation is less convenient if the camcorder is sitting on a table, connected to a TV during playback or working in a post-production suite as the camcorder must be secured to something in order to use the VCR controls. If Panasonic had included a remote control, optional on this model, playback would be a simpler process. In addition, while the Panasonic PV-GS180 is capable of variable speed playback and audio dubbing, these features are only available using the optional remote.
Ports* (6.5)*
The PV-GS180 is well-endowed in the port department, and includes a DV port (also known as FireWire and i.Link) located in the LCD cavity and a USB port on the camcorder’s right side port compartment. The headphone/AV and external Mic jacks are located in the same right side port compartment – and Panasonic should be lauded for including both of these jacks on the PV-GS180. They are all too frequently absent from consumer camcorders, and they add significantly to the value and versatility of this model. The SD card slot is located on the camcorder’s underside, so if the camcorder is mounted on a tripod it must be removed in order to insert a new card.


Other Features
Widescreen/16:9 Mode* (0.0)*
The PV-GS180 serves up three aspect ratio flavors: plain vanilla 4:3, 16:9, and cinema mode. The camcorder does not support true 16:9, but anamorphically squeezes a 16:9 aspect ratio image onto the 4:3 native chip. This results in a significant drop in video sharpness in 16:9 mode. The third aspect ratio setting, cinema mode, applies a letterbox to a 4:3 image that results in a video frame with a 16:9 aspect ratio at the cost of image information from the top and bottom of the frame. Cinema mode is useful if you want to record a 16:9 video frame that will playback without distortion or cropping on a standard 4:3 TV.
Scan Rates/24p* (0.0)*
The PV-GS180 records video only at 29.97 fps and does not offer a 24P mode.
Other Features* (7.5)*
Electronic Image Stabilization (EIS) – The PV-GS180 features an EIS system, which effectively reduces camera shake at a cost to image quality. Optical Image Stabilization (OIS) is a superior image stabilizing method which does not impact image quality, and is available on the PV-GS180.
Backlight Compensation - Backlight Compensation or BLC causes the camcorder to automatically overexpose the image, and is intend for use in very brightly lit environments like beaches or ski slopes when subjects may be underexposed.
Tele Macro - Telemacro zooms the camcorder to its maximum optical zoom at 10x and enables focus on objects as close as 40cm (16 inches). Tele Macro is a shortcut that automatically gives the method is minimum focal length, making it easier to throw backgrounds into soft focus.
Wind Cut - Wind Cut is a high-pass audio filter that helps to reduce the buffeting sounds of wind on the on-board microphone. It is a feature that reduces the overall quality of recorded audio and should only be used when necessary. In very windy situations, an external mic fitted with a good quality windscreen is a much more effective means of reducing wind noise..
Zoom Mic - The zoom mic feature boosts audio levels in tandem with the video zoom in order to capture distant sounds.
Quick Start - Quick Start is activated by pressing the Quick Start button at the rear of the camcorder. In Quick Start mode, the LCD screen can be closed, and a small indicator lamp near the Quick Start button is illuminated. When the LCD screen is opened or the camcorder is turned on, the PV-GS180 enters standby mode in 1.7 seconds, several seconds faster than in normal mode.
Comparisons / Conclusion
Comparison
Panasonic PV-GS59

The PV-GS180 is at the lowest end of Panasonic’s 3 CCD camcorder line and the PV-GS59 is at the top end of the 1 CCD line. So what separates these two camcorders other than two CCDs and $120? Actually quite a lot, and enough in our opinion to justify the price spread. Most notably, the PV-GS59 is no match for the PV-GS180 when it comes to video quality. The 3-chip model produces sharper, brighter, and produced better colors while the PV-GS59’s image was noisy and not terribly sharp, i.e. run-of-the-mill for a $379 camcorder. While video quality is the most important feature differentiating these two models, the PV-GS59 does have a 2.7" LCD, a powerful 30x optical zoom, and a remote control vs. only a 2.5" LCD, 10 x optical zoom, and no included remote on the PV-GS180. In short, the 1-chip Panasonic comes with more bells and whistles and a similar feature set but falls far short of the PV-GS180 in terms of video performance. We believe value trumps the other concerns, and so our vote goes to the PV-GS180.

Despite the fact that the $599 PV-GS180 and $699 PV-GS300 are both 3 CCD camcorders, and only one step apart in Panasonic’s consumer camcorder line, comparing the two is like comparing apples and oranges. Video quality was essentially identical despite the name-brand Leica Dicomar lens on the PV-GS300. The step-up camcorder adds a few other features over the PV-GS180: optical image stabilization, a 2.7" widescreen LCD, an included remote, a flash, a built-in lens cover, and higher resolution stills (2048 x 1320 vs. 1760 x 1320). But strangely, the PV-GS180 has an AV jack that doubles as a headphone out while the more expensive PV-GS300 has a composite AV/S-video port but no headphone capability. In our opinion, that’s a significant downgrade that rules out the PV-GS300 for any video application where sound monitoring is important – and that includes any professional production scenario. Yes, the added features on the PV-GS300 are nice but with a headphone out, the PV-GS180 is ultimately a more serious tool. Our vote is with the PV-GS180 in this head to head.

Canon’s Optura 50 was introduced in 2005, but remains available at the time of this publication. With a strong manual control set and…drum roll please…a real focus ring, it’s a decent camcorder that surpasses the Panasonic PV-GS180 in ease of use. The Canon is also built around a single 1-3/4" chip instead of the three 1/6" chips of the PV-GS180. The single large ship should yield excellent low-light performance and video resolution based on its size, while a three-chip design generally produces better color, but the Panasonic’s video performance was better all-around. In other respects, the camcorders are similar – both have microphone and headphone jacks, and both have 2.5" LCD’s. A last consideration is price: the Optura 50 had an initial MSRP of $499, $100 less than the PV-GS180, but street prices are comparable. Based largely on video performance, the PV-GS180 gets our nod but the Optura 50 is not a bad choice for users who like a simple interface.

The Sony DCR-HC46 and Panasonic PV-GS180 are worlds apart, and are good examples of the different approaches these manufacturers take to camcorder design. The DCR-HC46 excels in ease of use, and performs very well in Auto mode with quick focus, white balance and exposure adjustments. If you want to go beyond Auto, and take manual control of your picture, the Sony will disappoint with limited manual control adjustments that can only be accessed via the LCD touch screen, no mic jack, and a good picture that still falls short of the PV-GS180’s stellar video performance. The Panasonic simply offers more, with a great manual control set, external mic support, and better video. Unless you are a strict point-and-shooter, the PV-GS180 is a stronger and more versatile camcorder.
Who It’s For
Point-and-Shooters *(4.0)*
The PV-GS180 should prove to be simple enough for point and shooters, as the camcorder has solid automatic performance. Of course, its main strength is its manual control suite, and you’d be a fool not to take advantage of it.
Budget Consumers* (5.0)*
At $599 (MSRP), this is definitely on the upper-end of what one might consider a "budget camcorder." To make it quite plain, it’s worth it to upgrade from the PV-GS59, which cannot match the PV-GS180 in any type of performance.
Still Photo / Video Camera Hybrid* (3.0)*
The stills from the PV-GS180 are surprisingly good for a camcorder. The 1760 x 1320 image may be interpolated, but the colors certainly don’t suffer. The smaller stills compare quite favorably to camcorders in the same class.
Gadget Freaks* (2.0)*
Gadget freaks will not have much to drool over in this camcorder. Most of the innovations in the Panasonic MiniDV line came years ago. We are all riding out the medium until HD takes over.
Manual Control Freaks* (8.0)*
Of course anyone who finds themselves in this category knows that Panasonic is the way to go for a consumer camcorders. Fully independent aperture, shutter speed, gain, focus, and white balance, plus a host of one-touch fixes like telemacro and MagicPix are impossible to beat.
Pros/ Serious Hobbyists* (5.0)*
This year’s Panasonic MiniDV has lost a lot of the features of years past that made them so popular with serious hobbyists. While the manual control set still can’t be beat, the PV-GS400 still reigns supreme amongst the MiniDV cosmos.
Conclusion
Panasonic has not made it easy this year. Their entire 3-CCD line was revamped and scaled down, making them more affordable, but at the loss of a lot of features. The PV-GS180 replaces the PV-GS150, which sold for $699, one hundred dollars more than the PV-GS180. With the price cut came the loss of a hot accessory shoe, two remote control (one wired and one wireless), the DU12 battery (which has longer life), and editing software. That’s a pretty substantial cutback.
More importantly, though, is how it compares to this year’s models. When held up against the sibling models on either side, things look a little strange. The PV-GS59 ($379) has more features – a widescreen LCD, 30x zoom, and a remote control – but not nearly the video performance. The PV-GS300 ($699) has a few more features – optical image stabilization, a Leica lens, a widescreen LCD, a flash for stills, a remote control, and larger stills – but it loses the headphone jack of the PV-GS180, and its video performance was essentially identical, regardless of the lens upgrade. How can we make sense of all this?
It looks like the PV-GS180 is the smartest buy amongst the Panasonics in this category. The only camcorder to top it is the PV-GS500, or the saint among saints, the PV-GS400, which can still be found in the dark alleys of the internet. Both of those will cost you a fair bit more than the PV-GS180 and the PV-GS400 is certainly worth it if you can afford it.
The Sony DCR-HC46 does not offer much competition except in ease of use. It’s performance was its own worst enemy. The Canon Optura 50 offered some enticing features and performance, and is definitely worth investigating before you take your PV-GS180 to the checkout.
Do we wish the PV-GS180 had a widescreen LCD, optical image stabilization, and analog inputs? Of course we do. But this is the world we live in, where camcorders are more a commodity than dream machines. It’s a cold, hard, world, baby. The PV-GS180 might just help ease the pain. We recommend it highly.
Specs/Ratings
{{manufacturer_specs_table}}{{raw_scores_table}}
Meet the tester

David Kender oversees content at Reviewed as the Editor in Chief. He served as managing editor and editor in chief of Reviewed's ancestor, CamcorderInfo.com, helping to grow the company from a tiny staff to one of the most influential online review resources. In his time at Reviewed, David has helped to launch over 100 product categories and written too many articles to count.
Checking our work.
Our team is here for one purpose: to help you buy the best stuff and love what you own. Our writers, editors, and lab technicians obsess over the products we cover to make sure you're confident and satisfied. Have a different opinion about something we recommend? Email us and we'll compare notes.
Shoot us an email