
Performance
The Canon DC50 feature a very large 1/2.7" CCD, incrementally bigger than last year’s 1/2.8" chip. The new imager offers a 5390K gross pixel count, with an effective pixel count of 3690K in 16:9 and 3980K in 4:3. The DC50 has optical image stabilization (OIS), which unlike electronic stabilization, means that it does not reduce image quality when engaged. Last year’s DC40 did not have OIS. Last year, we loved the DC40’s produced an excellent color balance, but we found the picture a little noisy, especially around areas of high contrast. The imager will probably have less effect on that than the processor. As the processor has been upgraded from the Digic DV to the Digic DVII, we’re hoping for a big performance boost. Our informal, on the floor testing, we found the performance to be quite promising. It appeared to have a broad dynamic range and a solid overall performance. The limiting factor during a show, of course, is the relatively low resolution of the LCD, which can give you a false sense of things. We can say that the response time for exposure, white balance, and focus shifts seems to have increased from the DC40. This camcorder looks to be a promising choice for amateur sports video. **Low Light Performance**Again, the LCD can skewer results, but pointing the DC50 towards dark, shadowy areas produced some surprisingly good results. Even under a table draped with a black table cloth, the DC50 managed to grab a lot of usable information. The level of detail in the blacks was a welcome sight. That huge 1/2.7" CCD appears to be doing what we want it to - yield great low light performance.
Format
Compression
**The Canon DC50 compresses video in the MPEG-2 format, common to all standard definition HDD and DVD camcorders. It’s a limiting format, certainly of a lower quality than tape-based DV, but we’re not likely to see an improvement. The world is going high definition, and AVCHD, an MPEG-4 format, is the future (at least for now). There are three quality settings on the DC50 that correspond to maximum bit rates. The lower the bit rate, the more video you can fit on a disk. XP mode as an approximate data rate of 9Mbps, SP at 6Mbps, and LP at 3Mbps. ** **Media**The Canon DC50 records video to 8cm DVDs (also known as "miniDVD") in the following formats: DVD-R, DVD-RW, and DVD-R DL (dual layer). In the highest quality, a single layer disc can only hold about 20 minutes of video (double that for dual layer discs), which is probably the biggest drawback to DVD camcorders. A long trip means a bag full of DVDs, and one bad scratch on a disc could wipe out 20 minutes or more of important memories. This is one reason people cling to tape, which is remarkably durable. Hard disk drive (HDD) camcorders also avoid this problem. **Editing**Last year’s Canon DVD camcorders proved trickier to edit than most DVD camcorders, due to their annoying predilection of splitting up each clip into several files, rather than a united .MPG file like Sony does. Practically speaking, this meant that only the included Canon software could work with the footage, limiting your editing options. We have yet to see if this is the case again, but even if the DC50 exports files in the same manner, there are likely new editing solutions available.
Tour
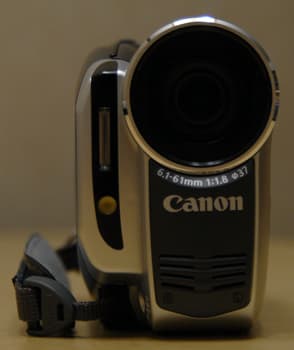
**The Front **The Canon DC50’s chief element on the front in the lens, with an aperture range of f/1.8 – f/3.0, and a focal range of 6.1 – 61mm (35mm equivalent in 4:3 is 44.7 – 447mm, and in 16:9 equals 43.8 – 438mm), with a 37mm filter diameter. The 10x optical zoom is enhanced for usability by an optical image stabilization, a highly sought-after feature in consumer camcorders. To the right of the lens is a flash, which can be used when in still photo mode. Below the flash is the video light, a mildly handy tool during low light conditions. Generally, however, the pinpoint of the luminance that an on-camera light provides is unflattering to your subject. Underneath the lens is the stereo microphone.
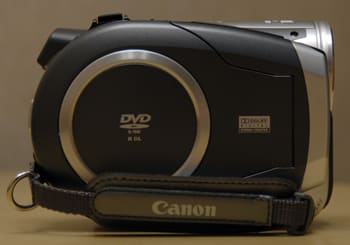
**The Right Side **The right side of the Canon DC50 is taken up mostly by the DVD loading bay. DVD camcorders tend to provide a very good grip, as the rounded lip on top makes for a convenient finger-hold. The hand strap, however, is on the thin side and low slung, which causes the camcorder to careen to the left. This is not a problem if you’re just pointing and shooting, but it can make one-handed operation with the joystick difficult.

**The Back **The back of the Canon DC50 contains a lot of the interface, although not quite as much as the DC40. Most notably, the Function button has migrated over to the left side (and the Menu button has been removed entirely, more on that in the Menu section below). Starting at the top of the DC50, there is a color EVF (123K resolution). The EVF is small, made of hard plastic, and neither telescopes nor pivots up or down. Below that is the video/still mode switch. Below that is the joystick, a tiny plastic nub that nonetheless manages to function very well as the main navigation tool, and is positioned well for the thumb. Clearly, they want to pitch this as camcorder as having one-hand operation. For simple one or two-movement joystick operations, you could probably manage it one handed. But for a lot of menu navigation, you’re going to want your left hand to keep it steady, as the poor balance the hand strap creates will keep your right hand busy just holding it steady. To the left of the joystick is the record on/off button. There is no label for this button, and no universally recognized "red dot" on the record button, so it could have been made clearer. But it’s well-placed for the thumb. Underneath the joystick is the switch for powering the camcorder off and on, as well as toggling between record and playback modes. Finally, the slider switch to open the DVD mechanism is located towards the very bottom, well out of the way of accidental brushes.

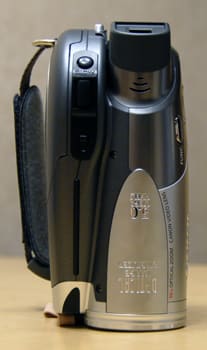
**The Left Side **The left side of the Canon DC50 is quite different from last year. Gone is the mode-dial borrowed from their still cameras – all those scene modes are now inside the menu. The VCR controls has wisely been shifted from a messy configuration on top to a neat row under the screen on the LCD panel. The LCD itself is the same as last year: 2.7" and 123K resolution. The image is bright and clear, though the resolution is not particularly high. Anything under 211K and you can see the pixels clearly. Along the top, above the LCD cavity, are the Function menu, Display, and Quick Start buttons. The Function button has replaced the Menu/Function tag team of buttons, which used to direct you towards a administrative menu (Menu) and a shorter manual control menu (Function). Now you get the Function menu first, and access the admin menu from there. The battery cavity, while still an enclosed design, is now deep enough to allow an expanded life battery. The battery that ships with it, the BP-208, only takes up about 1/2 the depth. Currently, the Canon store does not currently have a longer-life battery for sale, but we hope it’s forthcoming. To the right of battery slot is the USB 2.0 port and PictBridge button. The MiniSD card slot and AV-out port are located behind hard plastic flap just to the right of this. It appears that the rubber tether on the port cover has been lengthened since last year, which should eliminate a minor frustration.
**The Top**The top of the DC50 is quite simple. The zoom toggle, well-sized, is position on the right rear for the index finger. Behind that, necessitating a small reach, is the photo button. The other major button on top is the Auto/Manual switch, located in front of the zoom toggle. On the DC40, the easy mode was found on the mode dial. Now that the dial has been removed, this switch works just as well.
Auto / Manual Controls
Picture & Manual Control Automatic Control*In auto mode, most of the control is handed over to the camcorder, and only a limited number of options will be available in the Function menu. Auto controls on Canon camcorders are, historically, very good. Our impromptu testing on the DC50 showed the same excellent performance as last year’s DC40. It had a very fast auto focus, at least as fast as the new high definition HV10, which comes with a whole separate sensor dedicated to focusing. The DC50 showed a fast auto exposure, too, particularly in dark areas where light was spotty – which really impressed us. Again, this was all from the picture on the LCD, which can play tricks with image quality. But the large CCD and improved processor indicates that we should believe what we saw. *Overall Manual Control *A number of improvements have been made since last year in regards to handling and menu design, which we’ll get into a little later in the review, all of which affect your interaction with manual control. But the actual list of manual controls has remained the same as in years past. Because this is the top tier standard definition camcorder for 2007, at least so far, it comes with all the manual controls you would have found on their Optura series: aperture and shutter priority modes, exposure compensation, white balance, focus, zoom, and a small host of color controls. Aside from gain, this is about all you could ask for on a consumer camcorder. Of course, improvements need to be made to the focus control, which is entirely lackluster, and independent aperture and shutter speed would open up your shooting options a little more, but this is a great package for most users. *Zoom*The zoom toggle sits on top of the body, perfectly positioned for the index finger. It’s a tall, wide control that offers lots of grip and gives a good pressure. The optical zoom range extends to 10x, and the digital zoom can be capped at 40x or 200x. The DC50 also carries over a feature introduced last year: zoom speeds. A simplified version of a feature found of professional cams, this allows you to fix the zoom speed to fast, medium, or slow, regardless of finger pressure on the zoom toggle. *Focus *Focus control is still the weakest of all the manual controls on the DC50, not unlike most consumer camcorders. Activated by entering the new mini-menu (more about this in the Menu section below) that appears in the lower right-hand corner of the screen, the focus control consists of little more than pushing the joystick left and right until the picture looks "in focus." There is no onscreen scale or numerical indicator to tell you where in the focal range you are. Your only arbiter is the LCD, which has the relatively low resolution of 123K, hardly a high-res image. Poor focus controls seem to be the norm for consumer camcorders, and they don’t get stepped up until you hit the $2000+ price point. But that doesn’t make it right. *Exposure & Aperture *There are two ways to correct exposure on the Canon DC50, the first, and simplest, is the exposure compensation tool, found in the 3-page mini-menu (push in on the joystick to make it appear). Exposure compensation in on "page 2," and entails a scale of +/-11 increments. Each increment is an unspecified EV (exposure value) step. For most users, you won’t need to understand this in any more depth than this: smaller numbers make it darker, bigger numbers make it brighter. The real power of this control is that it can be used in addition to any setting that you’ve already made, like fixing the aperture or shutter speed. The second control is aperture, or the width of the iris. Iris control is good because it can shift the depth of focus. To engage aperture priority, go into the Function menu and change the top-most option from "P" to "A." Then exit the Function menu. The aperture value is located in the upper left corner of the screen. Push in on the joystick, then toggle up and down to shift it. Aperture values include: f/1.8, f/2.0, f/2.4, f/2.8, f/3.4, f/4.0, f/4.8, f/5.6, f/6.7, and f/8.0. *Shutter SpeedThe shutter speed can be controlled in shutter priority mode, which, like aperture priority, is selected in the Function menu. Change the "P" option on the top line to "S." Then exit the Function menu and use the joystick to toggle between shutter speeds. Options include: 1/8, 1/15, 1/30, 1/60, 1/100, 1/250, 1/500, 1/1000, and 1/2000 of a second. *White Balance*The white balance options are very easily accessible in the Function menu. Settings include AWB (auto white balance), Daylight, Shade, Cloudy, Tungsten, Fluorescent, Fluorescent H, and Set (for manual settings). This is the widest selection of white balance presets available on a consumer camcorder, and are found on several Canons. Presets are generally accurate, though we found the automatic settings to do an even better job on the DC50 (not untypical). To make a manual settings, point the camcorder at a white surface, then select the Set option and push in on the joystick. The icon will blink for a few seconds as it adjusts. *Gain*There is no manual gain setting on the DC50. *Other Manual Controls*Most upper-end Canons, including the DC50, offer "Image Effects" in the Function menu. These are settings that give you some measure of control over color. They don’t come close to matching what you’ll find on pro camcorders, but they can prove helpful if you’re looking to create a certain effect. The danger is in overusing them, as most of the settings are less than subtle. Four of the controls can only be turned on or off – that’s their range. They include: Vivid (for higher saturation), Neutral (lower saturation), Low Sharpening (to decrease sharpening), and Soft Skin Detail. There is a fifth option here, Custom, which lets you create your own image effect over four parameters: Depth, Sharpness, Contrast, Brightness. Each of these can be set to a +/-1 increment. Clearly, this is not the equivalent of having After Effects on-board your computer, but it’s something fun to play with, and can give you a look you weren’t expecting. Just don’t rely on it too much.
Still Features
**Still Features **The Canon DC50 is capable of taking stills up to 2581 x 1936, approximately 5MP. Stills are recorded to MiniSD card, which load on the left side, just behind the LCD cavity. According to Canon, they have continued to use MiniSD cards because that’s what fits best in the bodies of their DVD camcorders. We have a hard time believing that they couldn’t make everyone’s life easier and find an extra few millimeters for a fill size SD. Not only is MiniSD an unpopular format (outside of cell phones), but now that SDHC has upped the theoretical capacity of full sized cards to 32GB, it would make the DC50 a better long-term investment as a still camera hybrid. Last year’s DC40 stills were great, and this year’s are likely to look better, given the new processor and larger imager. **
**
Handling and Use
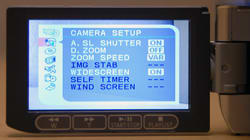
Ease of UseCanon camcorders have been steadily improving over the years to become among the easiest to use on the market. Sony still takes the cake in that department, but Canon is a close second. The major improvements over last year have centered on the handing and menu, so we’ll get to those in a minute. From a strictly ease of use perspective, the DC50 continues the tradition of intuitive interface and plain-text menu selections. HandlingThe Canon DC50 is almost exactly the same size and weight as last year’s DC40, so there is little difference in the immediate feel of last years’ model. But a number of small tweaks in body design have made major improvements in handing. The biggest change is the relocation of the joystick from the left side to the rear, allowing for one-handed operation. The only potential flaw here is the small, low-hung hand strap that causes the body to lean left if you’re not stabilizing it with your thumb. It will be hard to do much joystick movement without rocking the body and upsetting your shot. But it’s a big upgrade over last year where you couldn’t even see the joystick without tilting the camcorder towards you. The other big difference over last year is the menu simplification. No longer are the two buttons leading to the Function menu and administration menu. The admin menu has been folded into the Function which probably gets a lot more use. This has reduced the overall number of buttons. Two other features, Quick Start and optical image stabilization (OIS), have made a positive impact on handling. The former allows for a start-up time of 0.9 seconds from sleep mode; the latter helps smooth out any image shaking while shooting. **Menu**The menu system, which we already liked in the DC40, has been improved upon in a several meaningful ways. First, as mentioned above, there are no longer two buttons for the Function menu, which contains most of the manual controls, and the "administrative menu," our own term to classify the menu that contains less frequently used options like OIS on/off, time/date set, and disc finalizing. As the Function menu is surely used more frequently and in order to cut down on buttons, the admin menu is now accessed directly from the Function menu, which is listed as the last item on the list of options that runs down the left side. That list includes (from top to bottom): Mode (standard, aperture priority, or shutter priority), white balance, image effects, digital effects, video quality, still quality, and Main Menu (admin menu).
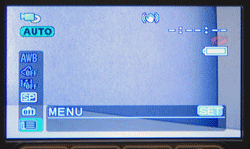
The administrative menu is now entered through the Function menu These menus have also received a tiny, but substantial improvement in handling. Formerly, when you got to the bottom of a list of options, you could not simply push the joystick "down" one more time to jump to the top of the list. Instead, you had up push up, up, up… to climb back to the beginning. No more! Now, finally abiding an unwritten, golden rule of usability, it’s much easier to jump around the menu. The next major improvement is the addition of a second, smaller manual control menu that we might call a "manual control mini-menu." Looking suspiciously like a feature found on Panasonic camcorders, the mini-menu is accessed by pushing in on the joystick. A small, circular icon appears in the bottom right of the screen. This is page 1 of 3, which you scroll through by more pushing on the joystick. Each page has some control options. Page 1: Quick Playback (plays the last few seconds you recorded), backlight compensation, and video light on/off; page 2: exposure compensation; page 3: focus. This mini-menu is something we’ve always loved in Panasonic camcorders, and we’re glad to see it adopted by others. **LCD and Viewfinder**The Canon DC50 features a 2.7" widescreen LCD with a 123K resolution. The electronic color viewfinder (EVF) is also a 16:9 aspect ratio, which is new this year and offers the same 123K resolution. The EVF cannot pivot or extend outward.
**
**
Audio / Playback / Connectivity
AudioAudio options on the Canon DC50 are rather limited. Sound is recorded through a stereo microphone located below the lens on the front of the camcorder. There is no mic input, no headphone jack, and no accessory shoe, hot or cold, to attach a mic. You’re stuck with what’s on board, which is generally terrible.
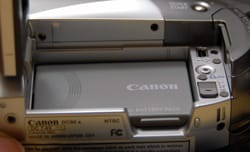
The battery slot, while still enclosed, looks to have room for expansion, unlike the DC40.** ****Playback**Playback mode is engaged by pushing down on the power switch on the back of the body. Nothing has really changed since last year. The clips are divided into thumbnails, and you use the joystick to toggle between them. The VCR buttons have relocated to a smarter place this year. Rather than cluttering up the left side of the body, as they did on the DC40, the DC50 now positions them in a row under the screen on the LCD panel. This makes more sense, as you can now seen the screen and the playback buttons at the same time, rather than placing them at a 45 degree angle. **Connectivity**While the manual controls on the DC50 are great, the array of ports is not. You’re limited to a USB jack located in the LCD cavity, right next to the MiniSD card slot and AV-out. The DC-in is on the right side towards the front. There is no mic jack, no headphone jack, no analog input, and no accessory shoe. The camcorder was clearly designed to be a self-contained unit that does what it claims – record good video – and nothing more.
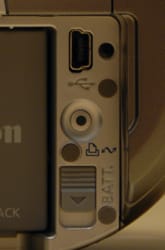
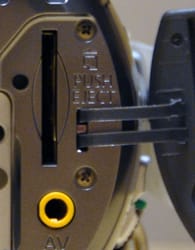
The USB port, located in the LCD cavity (left) and the AV-out and MiniSD card slot (right)** **
Other Features
**Other Features
***Digital effects* – Directly beneath the image effects in the Function menu, the digital effects are listed. These are the controls you typically want to avoid, the ones that have been on camcorder since the mid-1980s and are no funnier now than they were then: Sepia, Art, and Mosaic. There are some more useful settings here, if you’d rather not go through the editing process, including Fade, Wipe (each with a few options), and black & white. Markers: In the admin menu, you can select to have screen markers appear on the LCD. These are useful guidelines to help you compose shots, and are not recorded to the final footage. The Level tool creates a simple horizontal line bisecting the screen. The Grid breaks the screen up into 9 equal blocks. Both Level and Gris can be set to appear either grey or white.
Comparisons / Conclusion
ConclusionThe Canon DC50 is a great camcorder. Canon clearly spent a lot of time researching the weak points of the DC40 and improving upon them. The button placement is less cluttered and the menus have been improved. The performance, which was good to begin with, has surely improved with the new, larger imager and upgraded Digic DVII processor. From what we saw, the performance was very good, particularly in low light. The optical image stabilization is another major upgrade, and the room for battery expansion should please consumers. We’re very much looking forward to getting this into our labs for further testing. The downside is that the DC50 may be a little too self-contained. There is nowhere to go on this camcorder if you want to upgrade – no shoe, no mic input, no headphone jack, no analog input. What you see is what you get. Of course, what you get is pretty good, and that’s going to be enough for most users. More enthusiastic users looking at the standard definition DVD category will want to check out the Panasonic VDR-D310 or the Sony DCR-DVD508, both of which offer some additional audio options.
Specs/Ratings
{{manufacturer_specs_table}}{{raw_scores_table}}
Meet the tester

David Kender oversees content at Reviewed as the Editor in Chief. He served as managing editor and editor in chief of Reviewed's ancestor, CamcorderInfo.com, helping to grow the company from a tiny staff to one of the most influential online review resources. In his time at Reviewed, David has helped to launch over 100 product categories and written too many articles to count.
Checking our work.
Our team is here for one purpose: to help you buy the best stuff and love what you own. Our writers, editors, and lab technicians obsess over the products we cover to make sure you're confident and satisfied. Have a different opinion about something we recommend? Email us and we'll compare notes.
Shoot us an email